I’ve cooked many big roasts through the years, but a standing rib roast still feels special every time I prepare it.
The moment it goes into the oven, the whole kitchen shifts—quiet at first, then slowly filled with a rich aroma that makes everyone walk in to check what’s cooking.
It has a steady, calm confidence to it. No rush, no drama. Just slow heat working its way through a beautiful cut of beef.
I learned to trust this roast during a dinner I hosted for my family. I wanted a centerpiece that felt generous and warm, something that didn’t need a lot of decoration to make people stop and admire it.
When I sliced into it and saw that deep rosy center with a crisp, golden crust holding everything in place, the room felt a little lighter.
Not because it looked grand, but because it delivered exactly the kind of experience a good meal should give—quiet satisfaction and the feeling of having made a thoughtful choice.
That moment stayed with me, and every time I prepare this roast now, I think about how reliable it is.
As long as you respect the timing, give it space in the oven, and let it rest before cutting, it rewards you with tenderness that feels almost effortless.
It’s the sort of dish that doesn’t rush you. It lets you enjoy the process, the aroma, and the calm confidence of knowing the result will be worth the wait.
If you want a centerpiece that speaks through its flavor and texture rather than big claims, this standing rib roast is exactly that—rich, balanced, and deeply satisfying from the first slice to the last.
Standing Rib Roast Recipe
Ingredients
- 1 standing rib roast, about 3–4 ribs (approximately 3–4 kg), trimmed but with fat cap left on
- 2 teaspoons salt
- 2 teaspoons black pepper
- 2 teaspoons garlic powder
- 1 teaspoon onion powder
- 1 teaspoon paprika
- 2 teaspoons dried rosemary, crushed
- 1 teaspoon dried thyme
- 4 tablespoons olive oil
- 6 garlic cloves, minced
- Fresh rosemary and thyme sprigs (for roasting and serving)
Instructions
- Remove the roast from the refrigerator 1–2 hours before cooking so it reaches room temperature. This helps it cook more evenly and prevents the outer layer from overcooking while the inside stays cold.
- Pat the roast dry with paper towels. The drier the surface, the better the crust will form.
- In a small bowl, mix together salt, black pepper, garlic powder, onion powder, paprika, dried rosemary, dried thyme, olive oil, and minced garlic. Stir until it forms a thick paste.
- Place the roast bone-side down on a board. Rub the seasoning paste all over the top, sides, and edges. Make sure the paste reaches into any creases or uneven areas of the meat.
- Preheat the oven to 230°C.
While the oven heats, place the roast on a roasting rack set inside a roasting pan. Add a few fresh rosemary and thyme sprigs around the meat for aroma. - Once the oven is hot, place the roast on the middle rack. Roast at 230°C for 20 minutes. This step creates the browned, crisp crust.
- After 20 minutes, lower the oven temperature to 135°C without opening the oven door. Continue roasting for 1½ to 2½ hours depending on the size of your roast.
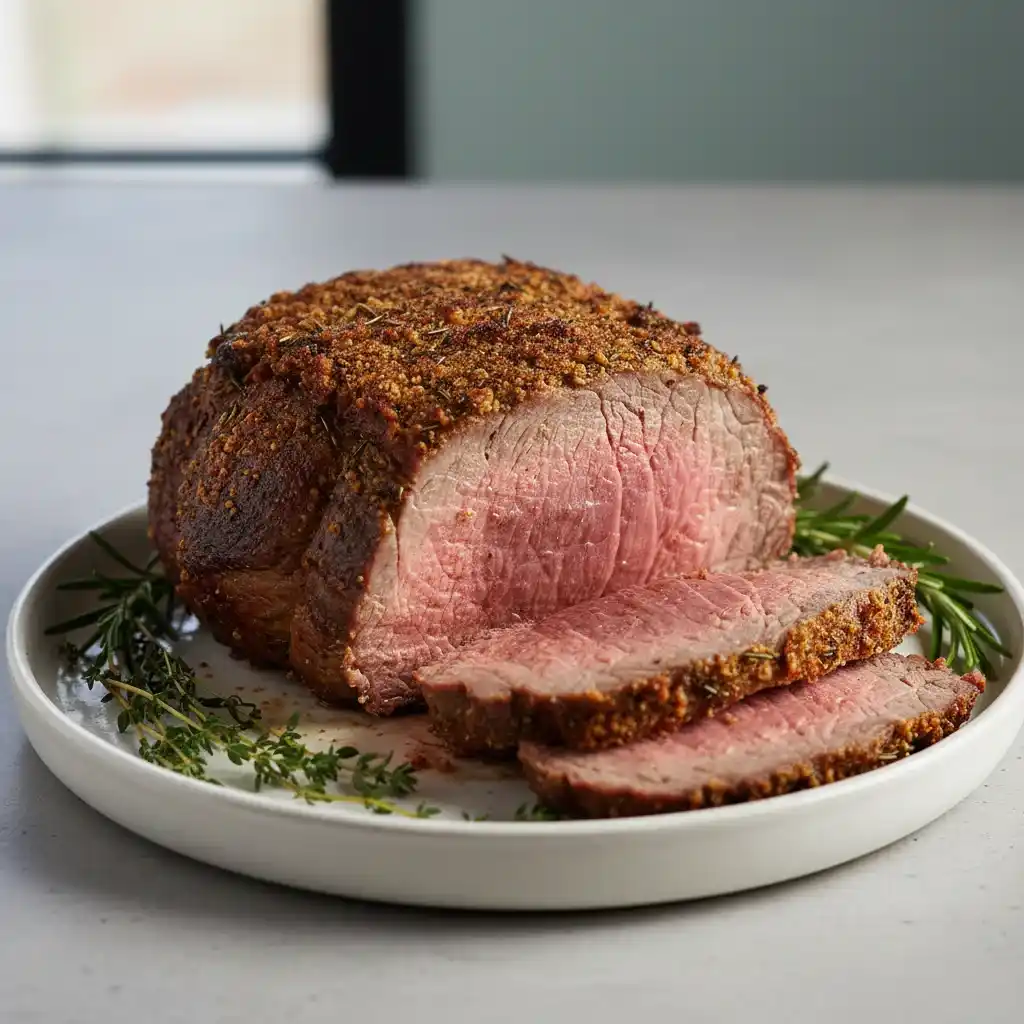
For a pink, tender center like the image: remove it when the internal temperature reaches 50–52°C (medium-rare). The temperature will rise further as it rests. - When the roast reaches the target temperature, remove it from the oven and transfer it to a board. Let it rest untouched for 25–30 minutes. This rest time is crucial because it allows the juices to settle inside the meat instead of spilling out when sliced.
- Once rested, carve between the ribs to remove the bone section, then slice the meat into thick, even slices. Serve with the fresh herbs from the roasting pan or add a few extra sprigs for a clean presentation.

Why Does A Standing Rib Roast Need To Reach Room Temperature Before Cooking?
Bringing the roast to room temperature makes a big difference in how evenly it cooks.
When a cold roast goes straight into a hot oven, the outside heats up too fast while the center stays cool. This creates uneven cooking.
Allowing the meat to rest on the counter before roasting helps the heat move through the beef at a steady pace, giving you that pink middle and tender bite from edge to edge.
It also helps the crust form better because surface moisture has time to dry out.
How Do You Know When A Standing Rib Roast Is Properly Cooked?
A standing rib roast cooks best when you rely on a thermometer instead of guessing by time alone.
Use an instant-read thermometer and check the thickest part, keeping the tip away from the bones. Stop roasting when the internal temperature reaches the level you like.
For a roast that stays juicy and pink inside, aim for the earlier temperature range.
As the roast rests, the heat continues to move toward the center, increasing the temperature slightly without drying the meat. This final rise is what gives you that soft, even color inside.
What Seasoning Works Best For A Standing Rib Roast?
Seasoning a standing rib roast is all about creating a deep flavor on the outside that complements the richness of the beef.
A mix of salt, pepper, garlic, onion powder, paprika, and dried herbs works well because each ingredient adds a layer of flavor. Salt helps the roast stay juicy. Pepper adds warmth.
Garlic and onion powder give a savory base. Paprika helps the crust brown beautifully. Dried rosemary and thyme release aroma when heated and blend well with beef.
When you mix these with oil, they form a paste that sticks to the roast and turns into a flavorful crust.
Why Is Resting A Standing Rib Roast So Important?
Resting the roast is just as important as roasting it. When the roast comes out of the oven, the juices inside are very hot and sitting close to the surface.
If you cut it too soon, those juices spill out and leave the slices dry. By resting the roast, the juices calm down and spread evenly throughout the meat.
This is why the roast feels more tender and moist when sliced after resting. Giving it 25–30 minutes makes a noticeable difference in flavor and texture.
What Is The Correct Way To Slice A Standing Rib Roast?
Proper slicing protects the texture and keeps the roast tender. Start by removing the bones as one whole piece. Cutting along the curve of the bones gives you a clean separation.
After removing them, lay the roast flat and slice across the grain. Cutting across the grain shortens the muscle fibers, making every bite softer and easier to chew.
Thick, steady slices help the roast hold its moisture better than paper-thin cuts.
How Do You Keep The Crust Crispy On A Standing Rib Roast?
A crisp crust comes from dry meat, high heat, and proper resting. Here are simple practices that help maintain a good crust:
- Dry Surface: Pat the roast dry before seasoning. Moisture stops browning.
- High Initial Heat: Start roasting at a high temperature so the crust forms quickly.
- Herb Paste: Use an oil-based rub so the seasonings stick and roast evenly.
- No Foil During Cooking: Covering the roast traps steam and softens the crust.
As long as you allow the crust to form at the beginning and avoid steam, the texture stays crisp and aromatic.
Can You Add Vegetables To The Roasting Pan?
Vegetables can be added, and they absorb the flavorful drippings beautifully.
You can place firm vegetables near the base of the pan. They should sit around the roast, not underneath it, so air can circulate.
Good options include carrots, onions, garlic heads, and potatoes. These vegetables soften slowly and absorb the juices dripping from the roast, giving them a rich taste.
Keeping space around the roast helps it brown properly while still flavoring the vegetables.
What Are Common Mistakes When Cooking A Standing Rib Roast?
Small mistakes can affect how the roast cooks, but they are easy to avoid. Before cooking, it helps to know these common issues:
- Starting With A Cold Roast: Makes the center stay raw while the outside overcooks.
- Skipping The Thermometer: Roasts vary in size and shape, so time alone isn’t reliable.
- Carving Too Soon: Releases juices and dries out the slices.
- Using Too Much Steam: Steam softens the crust and prevents browning.
- Placing Vegetables Under The Roast: Blocks airflow and interrupts even heating.
These small habits help you get a more controlled and consistent result every time.
How Can You Store Leftover Standing Rib Roast Safely?
Proper storage protects both taste and freshness of the leftover roast. Allow the roast to cool completely before storing it. Wrap the slices tightly or place them in airtight containers.
This helps prevent dryness and slows down the flavor loss that happens when meat is exposed to air.
- Refrigerator: Store slices for 3–4 days.
- Freezer: Wrap each slice tightly, then pack them together. Frozen slices can last up to 2 months.
When reheating, warm the slices slowly so they stay moist. Covering them and adding a spoonful of broth in the pan prevents dryness and keeps the meat tender.
How Do You Reheat Leftover Standing Rib Roast Without Drying It?
Reheating needs gentle heat so the meat stays pink and soft. Place the slices in a small baking dish and cover them. Add a small amount of broth to keep the meat moist.
Heat at a low temperature until warmed through. Avoid using very high heat because it makes the meat tough and turns the color dull.
Gentle reheating allows the leftover roast to taste nearly as good as the freshly cooked one.
What Makes A Standing Rib Roast A Good Choice For Special Occasions?
A standing rib roast offers reliable tenderness and strong flavor, making it a thoughtful centerpiece.
The rich aroma, balanced texture, and natural juiciness of this cut create a sense of warmth at the table.
The slow roasting process builds flavor throughout the meat while forming a crust that looks impressive when sliced.
It brings a calm, steady pace to cooking, giving you time to prepare the rest of the meal without rushing.
Its size makes it ideal for groups, and its deep flavor stays memorable long after the meal ends.
You May Also Like To Check Out These Recipes
- 55 Christmas Cake Ideas That Make Your Holiday Table Shine
- Best Prime Rib Recipe
- White Chocolate Cranberry Cookies
- Cranberry Christmas Cake
- Chocolate Yule Log Cake
- Christmas Cake Pops
- Christmas Tree Cake Cheesecake
- Beef Wellington
- Chicken Pot Pie
- Cranberry Jalapeño Dip
- Cranberry Pecan Cheese Ball
- Eye of Round Roast
- Slow Roasted Beef Tenderloin
- Perfect Rib Eye Steak In Oven