The first time I made these skeleton Halloween cupcakes, the kitchen turned into a carnival of laughter.
My nieces stood around the counter, wide-eyed, waiting for the moment when the marshmallow skulls would sit proudly on top of their sprinkle-covered cupcakes.
The room went silent for half a second, and then the giggles exploded—suddenly those little skeletons looked less scary and more like playful characters ready for a party.
That’s the beauty of these cupcakes. They carry a balance of fun and thrill, making them just right for a Halloween gathering where kids want something colorful and exciting, and adults can’t resist a sweet treat with a touch of mischief.
Each bite gives you soft cake, buttery frosting, and the crunch of sprinkles before you meet the skeleton head on top.
It’s the kind of treat that makes the dessert table feel alive, even when the decorations are all about skeletons and ghosts.
When I set a tray of these out at a party, nobody walks past without stopping. Kids want to grab the one with the biggest grin, while adults sneak smiles as they pick their favorite.
And honestly, that’s the magic here—it isn’t just dessert, it’s a moment of joy, a playful detail that makes Halloween night even more memorable.
Skeleton Halloween Cupcakes Recipe
Ingredients
For The Cupcakes
- 1 ½ cups all-purpose flour
- 1 ½ teaspoons baking powder
- ¼ teaspoon baking soda
- ¼ teaspoon salt
- ½ cup unsalted butter, softened
- ¾ cup granulated sugar
- 2 large eggs, room temperature
- 1 teaspoon vanilla extract
- ½ cup whole milk, room temperature
For The Frosting And Decoration
- 1 cup unsalted butter, softened
- 3 cups powdered sugar, sifted
- 2 tablespoons milk
- 1 teaspoon vanilla extract
- Rainbow sprinkles, enough to cover all cupcakes
- Large marshmallows (one per cupcake, for skeleton heads)
- Black edible food marker or black gel icing (for drawing faces)
- Mini pretzel twists (for skeleton arms)
- Toothpicks or small food-safe sticks (to hold the marshmallow heads)
Instructions
- Preheat oven to 350°F (175°C) and line a 12-cup muffin tray with paper cupcake liners.
- In a medium bowl, whisk flour, baking powder, baking soda, and salt until combined.
- In a large bowl, beat butter and sugar together until light and fluffy. Add eggs one at a time, mixing well after each. Stir in vanilla extract.
- Add half the flour mixture, then mix gently. Pour in the milk and blend. Finish with the remaining flour mixture, mixing only until combined.
- Spoon batter evenly into liners, filling each about two-thirds full. Bake 18–20 minutes or until a toothpick inserted in the center comes out clean. Cool cupcakes completely before decorating.
- For frosting, beat butter until creamy, then gradually mix in powdered sugar. Add milk and vanilla and beat until smooth and spreadable.
- Spread a thin, even layer of frosting over each cupcake. Press the tops into rainbow sprinkles until fully coated.
- To create skeleton heads, draw faces on large marshmallows with a food marker or black gel icing. Let them set briefly.
- Insert a toothpick into the bottom of each marshmallow head, then press into the center of each cupcake so the skeleton face sits upright.
- Break pretzel twists into small curved pieces and insert them on both sides of the marshmallow head to resemble skeleton arms. Adjust until secure and balanced.
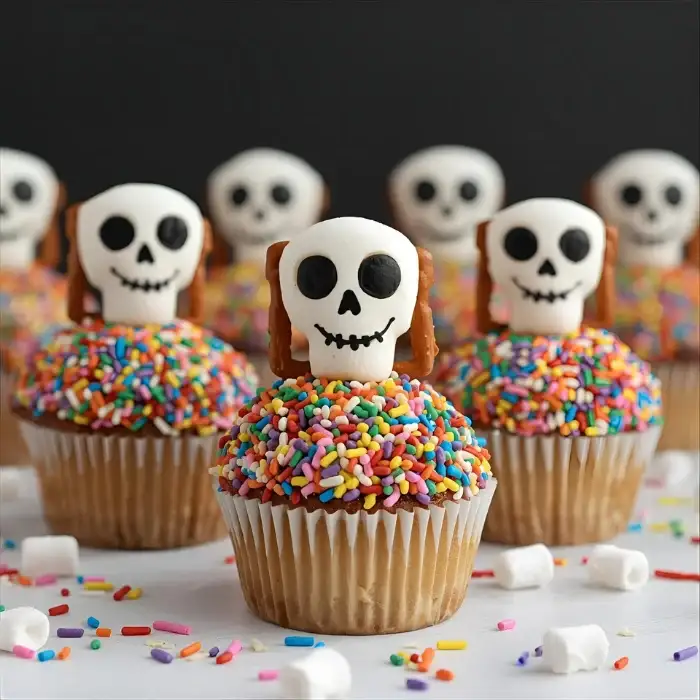
- Repeat with all cupcakes until you have a tray of sprinkle-covered cakes topped with cheerful skeletons.

What Makes Skeleton Halloween Cupcakes Special?
These cupcakes stand out because they are not only colorful and delicious, but they also bring fun and character to any Halloween table.
The mix of soft cake, creamy frosting, and crunchy sprinkles creates layers of texture that make each bite more exciting.
On top of that, the marshmallow skeleton heads add a playful touch that makes kids laugh and adults smile. They are both a dessert and a decoration, which makes them unforgettable.
How Can I Make The Skeleton Heads Look Neat?
Making the skeleton heads is easier than it looks if you follow a few simple steps. The secret is to keep everything steady and take your time with the details.
- Use fresh marshmallows: Fresh marshmallows are firm but soft enough to hold shape. Stale ones will crack or crumble.
- Draw the faces before assembly: It’s easier to decorate the marshmallow heads while they are flat on a surface rather than after placing them on the cupcakes.
- Allow faces to set: Give the edible marker or black gel icing a few minutes to dry before handling, so it doesn’t smudge on your fingers or frosting.
- Secure with toothpicks: Insert a small toothpick into the marshmallow base before placing it into the cupcake so the skull stays upright.
Can I Use Chocolate Instead Of Food Markers For The Skeleton Faces?
Yes, chocolate works very well and can even give a richer look. Melt a small amount of dark chocolate and use a fine-tipped brush or a toothpick to paint the eyes, nose, and smile onto each marshmallow.
Chocolate hardens quickly, which helps prevent smudging, and it adds an extra flavor layer. Just make sure the marshmallows are completely dry before decorating with chocolate so it sticks properly.
What Flavors Work Best For Skeleton Halloween Cupcakes?
Vanilla is a classic choice because it balances perfectly with colorful sprinkles and rich frosting. However, other flavors can add variety if you want to surprise your guests.
- Chocolate cupcakes: For those who love a deeper taste, chocolate pairs beautifully with rainbow sprinkles and marshmallows.
- Pumpkin spice cupcakes: A seasonal option that brings warmth and a gentle spice, perfect for fall gatherings.
- Red velvet cupcakes: The vibrant red cake creates a striking effect when topped with skeleton heads, making them more dramatic.
How Do I Store Skeleton Halloween Cupcakes?
Storage is very important if you want to keep your cupcakes looking fresh and tasting great.
- Room temperature: Keep them in an airtight container for up to 2 days. This keeps the cake soft and prevents the sprinkles from melting into the frosting.
- Refrigerator: Store in the fridge for up to 5 days if you need more time. Allow them to come back to room temperature before serving for the best texture.
- Avoid stacking: Do not stack decorated cupcakes on top of each other, or the skeleton faces will get ruined. Use a cupcake carrier or a wide, flat container instead.
- Freezer option: Cupcakes without decorations can be frozen for up to 2 months. Wrap each cupcake tightly in plastic wrap and store in a freezer bag. Frost and decorate them only after thawing.
Can I Prepare The Decorations Ahead Of Time?
Yes, preparing ahead makes assembly quicker on the day you serve them.
- Make the skulls early: Decorate marshmallow skeleton heads the night before and let them sit uncovered at room temperature. They will dry well and hold their design.
- Break pretzels ahead: Pretzel arms can be snapped into shape in advance and stored in a small container until you’re ready to decorate.
- Bake cupcakes a day early: Bake and store plain cupcakes in an airtight container, then frost and decorate them on the day of serving to keep the sprinkles crunchy and the skulls fresh.
Can Kids Help In Making Skeleton Halloween Cupcakes?
Yes, this recipe is perfect for getting kids involved in the kitchen because it feels like a craft project more than baking.
- Decorating marshmallows: Kids love drawing the skeleton faces. Give them edible markers and let them create funny or scary expressions.
- Dipping cupcakes in sprinkles: This step is simple, fun, and mess-friendly for younger helpers.
- Placing skeleton heads: With a little guidance, children can set the marshmallow skulls on top, making them proud of their work.
How Do I Serve Skeleton Halloween Cupcakes At A Party?
Presentation is as important as taste when it comes to Halloween treats.
- Arrange on a tray: Place the cupcakes in a circle or rows so the skeleton heads all face outward, making it look like a group of characters standing together.
- Add extra sprinkles around the tray: Scatter colorful sprinkles for a festive effect.
- Use themed decorations: Place small pumpkins, plastic spiders, or cobwebs around the serving area for extra Halloween flair.
You May Also Like To Check Out These Recipes
- Crustless Pumpkin Pie
- Pumpkin Cream Cheese Muffins
- Baked Cinnamon Apples
- Pumpkin Pie Cookies
- Pumpkin Chocolate Chip Cookies
- Halloween Pumpkin Cake
- Decorated Pumpkin Shaped Cookies
- Jack Nightmare Before Christmas Cake
- Halloween Charcuterie Board
- Halloween Fruit Platter
- Halloween Veggie Tray
- Halloween Chocolate Bark
- Halloween Cookie Cake
- Halloween Graveyard Dirt Cake
- Halloween Eyeball Pizza
- Halloween Cake Pops
- Halloween Chocolate Covered Strawberries
- Halloween Ghost Pizza
- Halloween Melted Witch Cake
- Halloween Mini Mummy Pizzas
- Halloween Vegan Spider Pizza Bites
- Pumpkin Cheese Ball
- 7 Layer Halloween Taco Dip
- Halloween Brownies
- Halloween Ghost Cookies
- Halloween Cheese Dip
- Halloween Deviled Eggs
- Halloween Dirt Cups
- Halloween Mummy Wrap Cookies
- Halloween Pasta Salad
- Halloween Frankenstein Cookies
- Halloween Oreos
- Halloween Popcorn Balls
- Halloween Pretzels
- Halloween Pumpkin Face Cookies
- Halloween Rice Krispie Treats
- Halloween Snack Mix
- Halloween Spiderweb Pancakes
- Halloween Spiderweb Cookies
- Halloween Vampire Teeth Cookies
- Halloween Witch Hat Cupcakes
- Halloween Bat Cookies