I grew up with a soft spot for peanut butter and chocolate, but the day I bit into a proper peanut butter cup, it was game over.
The smooth snap of chocolate breaking under my teeth and that dense, creamy peanut butter center sealed the deal forever.
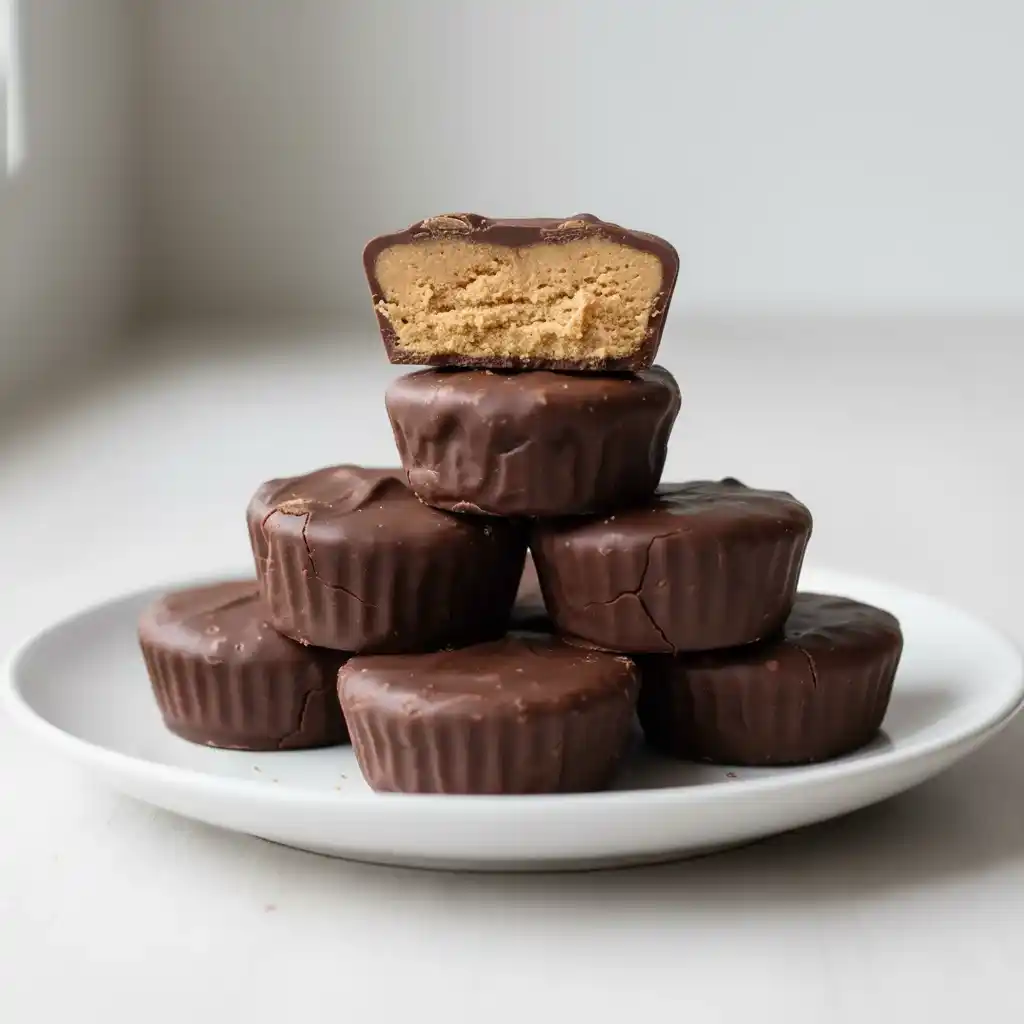
It felt less like candy and more like a little treasure you could hold in your hand. Making them at home quickly became a ritual.
The process is straightforward, but the reward is striking—each cup comes out looking neat and polished, with layers that hold firm yet melt effortlessly in your mouth.
I’ve found that the balance is everything: the chocolate should be rich and smooth, while the filling needs to be thick, nutty, and just sweet enough to shine.
These peanut butter cups taste fresh in a way store-bought never does. They’ve got weight to them, a bite that feels solid, and a filling that’s both creamy and slightly crumbly.
You can keep them chilled for a satisfying snap or let them soften a bit at room temperature for a silkier bite. Either way, they don’t last long on the plate.
Peanut Butter Cups Recipe
Ingredients
- 2 cups milk chocolate chips (or high-quality milk chocolate, chopped)
- 1 cup creamy peanut butter
- 1/4 cup powdered sugar, sifted
- 2 tablespoons unsalted butter, softened
- 1 teaspoon pure vanilla extract
- Pinch of fine salt
Instructions
- Line a standard muffin tin with 12 paper liners. Set aside.
- Melt half of the chocolate chips in a heatproof bowl over a saucepan of simmering water or in the microwave in 20-second bursts, stirring until smooth.
- Spoon about 1 teaspoon of melted chocolate into each liner and tilt the pan or use the back of a spoon to spread it evenly across the bottom. Place the tray in the refrigerator for 10 minutes until set.
- In a mixing bowl, combine peanut butter, powdered sugar, butter, vanilla extract, and salt. Stir until smooth and creamy but thick enough to hold shape.
- Roll the filling into small balls (about 1 tablespoon each), flatten slightly into discs, and place one in the center of each hardened chocolate base. Gently press down so it spreads but does not touch the edges completely.
- Melt the remaining chocolate, again stirring until smooth. Spoon enough melted chocolate over each peanut butter disc to cover it fully and smooth out the tops.
- Tap the pan lightly on the counter to release air bubbles and ensure an even surface.
- Refrigerate the tray for at least 25–30 minutes, or until the chocolate is firm.
- Peel off the liners before serving.

How To Store Homemade Peanut Butter Cups?
Homemade peanut butter cups keep their taste and texture best when stored properly. If you leave them at room temperature for too long, the chocolate may soften or develop a white coating called bloom. To avoid this, keep them chilled.
- Refrigerator storage: Place peanut butter cups in an airtight container and refrigerate for up to 2 weeks. This keeps the chocolate firm and the filling fresh.
- Freezer storage: For longer storage, freeze them in a sealed freezer-safe container or bag for up to 2 months. Let them sit at room temperature for 10 to 15 minutes before eating to bring back their creamy texture.
- Room temperature storage: If your home is cool and dry, they can stay in a tightly sealed container at room temperature for about 2 to 3 days, but refrigeration is safer.
Can I Use Different Types Of Chocolate For Peanut Butter Cups?
Yes, the choice of chocolate changes the flavor in noticeable ways. The classic option is milk chocolate, but you can use others based on taste.
- Milk chocolate: Gives the traditional sweet and creamy taste that balances perfectly with peanut butter.
- Dark chocolate: Provides a richer and slightly bitter flavor that makes the filling taste less sweet.
- White chocolate: Creates a sweeter overall candy with a smoother taste.
- Chocolate blends: Mixing milk and dark chocolate can make the flavor more balanced if you don’t want it too sweet or too bitter.
What Peanut Butter Works Best For Peanut Butter Cups?
Not all peanut butters give the same result. The type you choose affects both texture and flavor of the filling.
- Creamy peanut butter: Works best because it creates a smooth, even filling.
- Natural peanut butter: Can be used, but you need to stir it well to prevent oil separation. If it feels too runny, add a little more powdered sugar.
- Crunchy peanut butter: Adds texture with small nutty bits, but the cups won’t look as smooth when sliced.
Can I Add Other Fillings Inside Peanut Butter Cups?
Many people like experimenting with flavors, and peanut butter cups can be customized.
- Nut spreads: Almond butter, cashew butter, or hazelnut spread can replace peanut butter.
- Mix-ins: Shredded coconut, crushed cookies, or rice cereal can be stirred into the filling for extra crunch.
- Flavors: A drop of pure vanilla, maple, or a sprinkle of sea salt on top can enhance the taste.
Why Do My Peanut Butter Cups Stick To The Liners?
Sometimes the chocolate sticks tightly to paper liners, which can be frustrating.
- Use quality liners: Thicker or parchment-style liners release more easily.
- Chill before peeling: Wait until the cups are fully chilled before removing the liner. This helps the chocolate separate cleanly.
- Grease lightly: If sticking continues, very lightly brush the liners with neutral oil before pouring the chocolate.
Can Peanut Butter Cups Be Made In Advance For Events?
Yes, they are a great make-ahead treat because they hold well in storage.
- Make ahead for short-term: Prepare and refrigerate them up to 3 days before serving, keeping them sealed in an airtight container.
- Make ahead for long-term: Freeze them weeks in advance, then thaw in the fridge overnight the day before your event.
How To Prevent Chocolate From Cracking On Top?
Cracked chocolate can spoil the look of peanut butter cups, but you can avoid it.
- Proper cooling: Let the chocolate set gradually in the fridge, not the freezer, so it firms without cracking.
- Tap the pan: After pouring chocolate on top, gently tap the muffin tray to remove air bubbles.
- Even layers: Make sure the peanut butter layer is flat so the top chocolate spreads smoothly.
What Common Mistakes Should Be Avoided When Making Peanut Butter Cups?
Even though peanut butter cups are simple to prepare, small mistakes can affect their look and taste. Here are the most common issues and how to avoid them:
- Using warm peanut butter filling: If the filling is too soft or warm, it will mix with the melted chocolate instead of sitting neatly in the center. Always let the filling firm up slightly before adding it to the cups.
- Not letting the bottom chocolate layer set fully: Rushing this step makes the peanut butter sink into the chocolate instead of sitting on top. Chill the first chocolate layer until completely firm before adding the filling.
- Overfilling with peanut butter: Adding too much filling can cause the chocolate layer on top to break or not cover completely. Use small, flattened discs that leave space around the edges.
- Pouring hot melted chocolate directly over the filling: If the chocolate is too hot, it can melt the peanut butter layer. Let the chocolate cool slightly after melting before spooning it on top.
- Storing in a warm place: Leaving the cups at room temperature for too long makes the chocolate melt or develop white streaks. Always store in the refrigerator or freezer for the best texture.
- Peeling liners too early: Removing the liners before the chocolate has set completely causes cracks and uneven edges. Wait until they are firm and cold before peeling.
Tips To Make Peanut Butter Cups Look Professional
If you want your peanut butter cups to look as good as they taste, a few small tricks can make a big difference. These tips help you get neat layers, smooth tops, and a polished finish.
- Use high-quality chocolate: Smooth, glossy chocolate melts better and sets with a shiny finish, making the cups look store-bought.
- Line the cups evenly: When spreading the first layer of chocolate, make sure it fully covers the bottom without going too thick. This keeps the base flat and even.
- Flatten the filling: Shape the peanut butter filling into discs before placing them on the base layer. This keeps the layers tidy and prevents lumps.
- Tap the tray: After pouring the top layer of chocolate, gently tap the muffin tray against the counter. This removes air bubbles and smooths out the surface.
- Chill at the right time: Place the cups in the fridge immediately after assembling. Quick cooling helps the layers set evenly without streaks.
- Trim edges if needed: If any chocolate spills over, you can carefully trim the edges with a small knife after they are set for a cleaner look.
You May Also Like To Check Out These Recipes
- Crustless Pumpkin Pie
- Pumpkin Cream Cheese Muffins
- Baked Cinnamon Apples
- Oven Roasted Sweet Potatoes Wedges
- Roasted Sweet Potato Black Bean Bowl
- Pumpkin Pie Cookies
- Pumpkin Chocolate Chip Cookies
- Halloween Pumpkin Cake
- Creamy Pumpkin Soup With Roasted Seeds
- Soft & Fluffy Pumpkin Chocolate Chip Muffins
- Sweet Potato Casserole With Marshmallows
- Homemade Pumpkin Pie
- Decorated Pumpkin Shaped Cookies
- Mini Pumpkin Cheesecakes
- Pumpkin Cake With Cinnamon Cream Cheese Frosting
- Starbucks Pumpkin Cream Cheese Muffins
- Old-Fashioned Date Cake
- Vegan Apple Cake
- Moist Plum Cake
- Jack Nightmare Before Christmas Cake
- Halloween Charcuterie Board
- Halloween Fruit Platter
- Halloween Veggie Tray
- Halloween Chocolate Bark
- Halloween Cookie Cake
- Halloween Graveyard Dirt Cake
- Halloween Eyeball Pizza
- No Bake Cheesecake Without Cream Cheese
- Halloween Cake Pops
- Halloween Chocolate Covered Strawberries
- Halloween Ghost Pizza
- Halloween Melted Witch Cake
- Halloween Mini Mummy Pizzas
- Halloween Vegan Spider Pizza Bites
- Mexican Street Corn White Chicken Chili
- Peanut Butter Fudge
- Pumpkin Bread Truffles
- Pumpkin Fudge
- Pumpkin Cake Roll With Cream Cheese Filling
- Sweet Potato Cake
- Pumpkin Cupcakes With Caramel Cream Cheese Frosting
- Beef Stuffed Acorn Squash
- Air Fryer Pumpkin Seeds
- Pumpkin Empanadas
- Pumpkin Cheese Ball
- Apple Crisp With Oats And Melted Butter