Halloween baking always feels more like play than work, and this cake proves it.
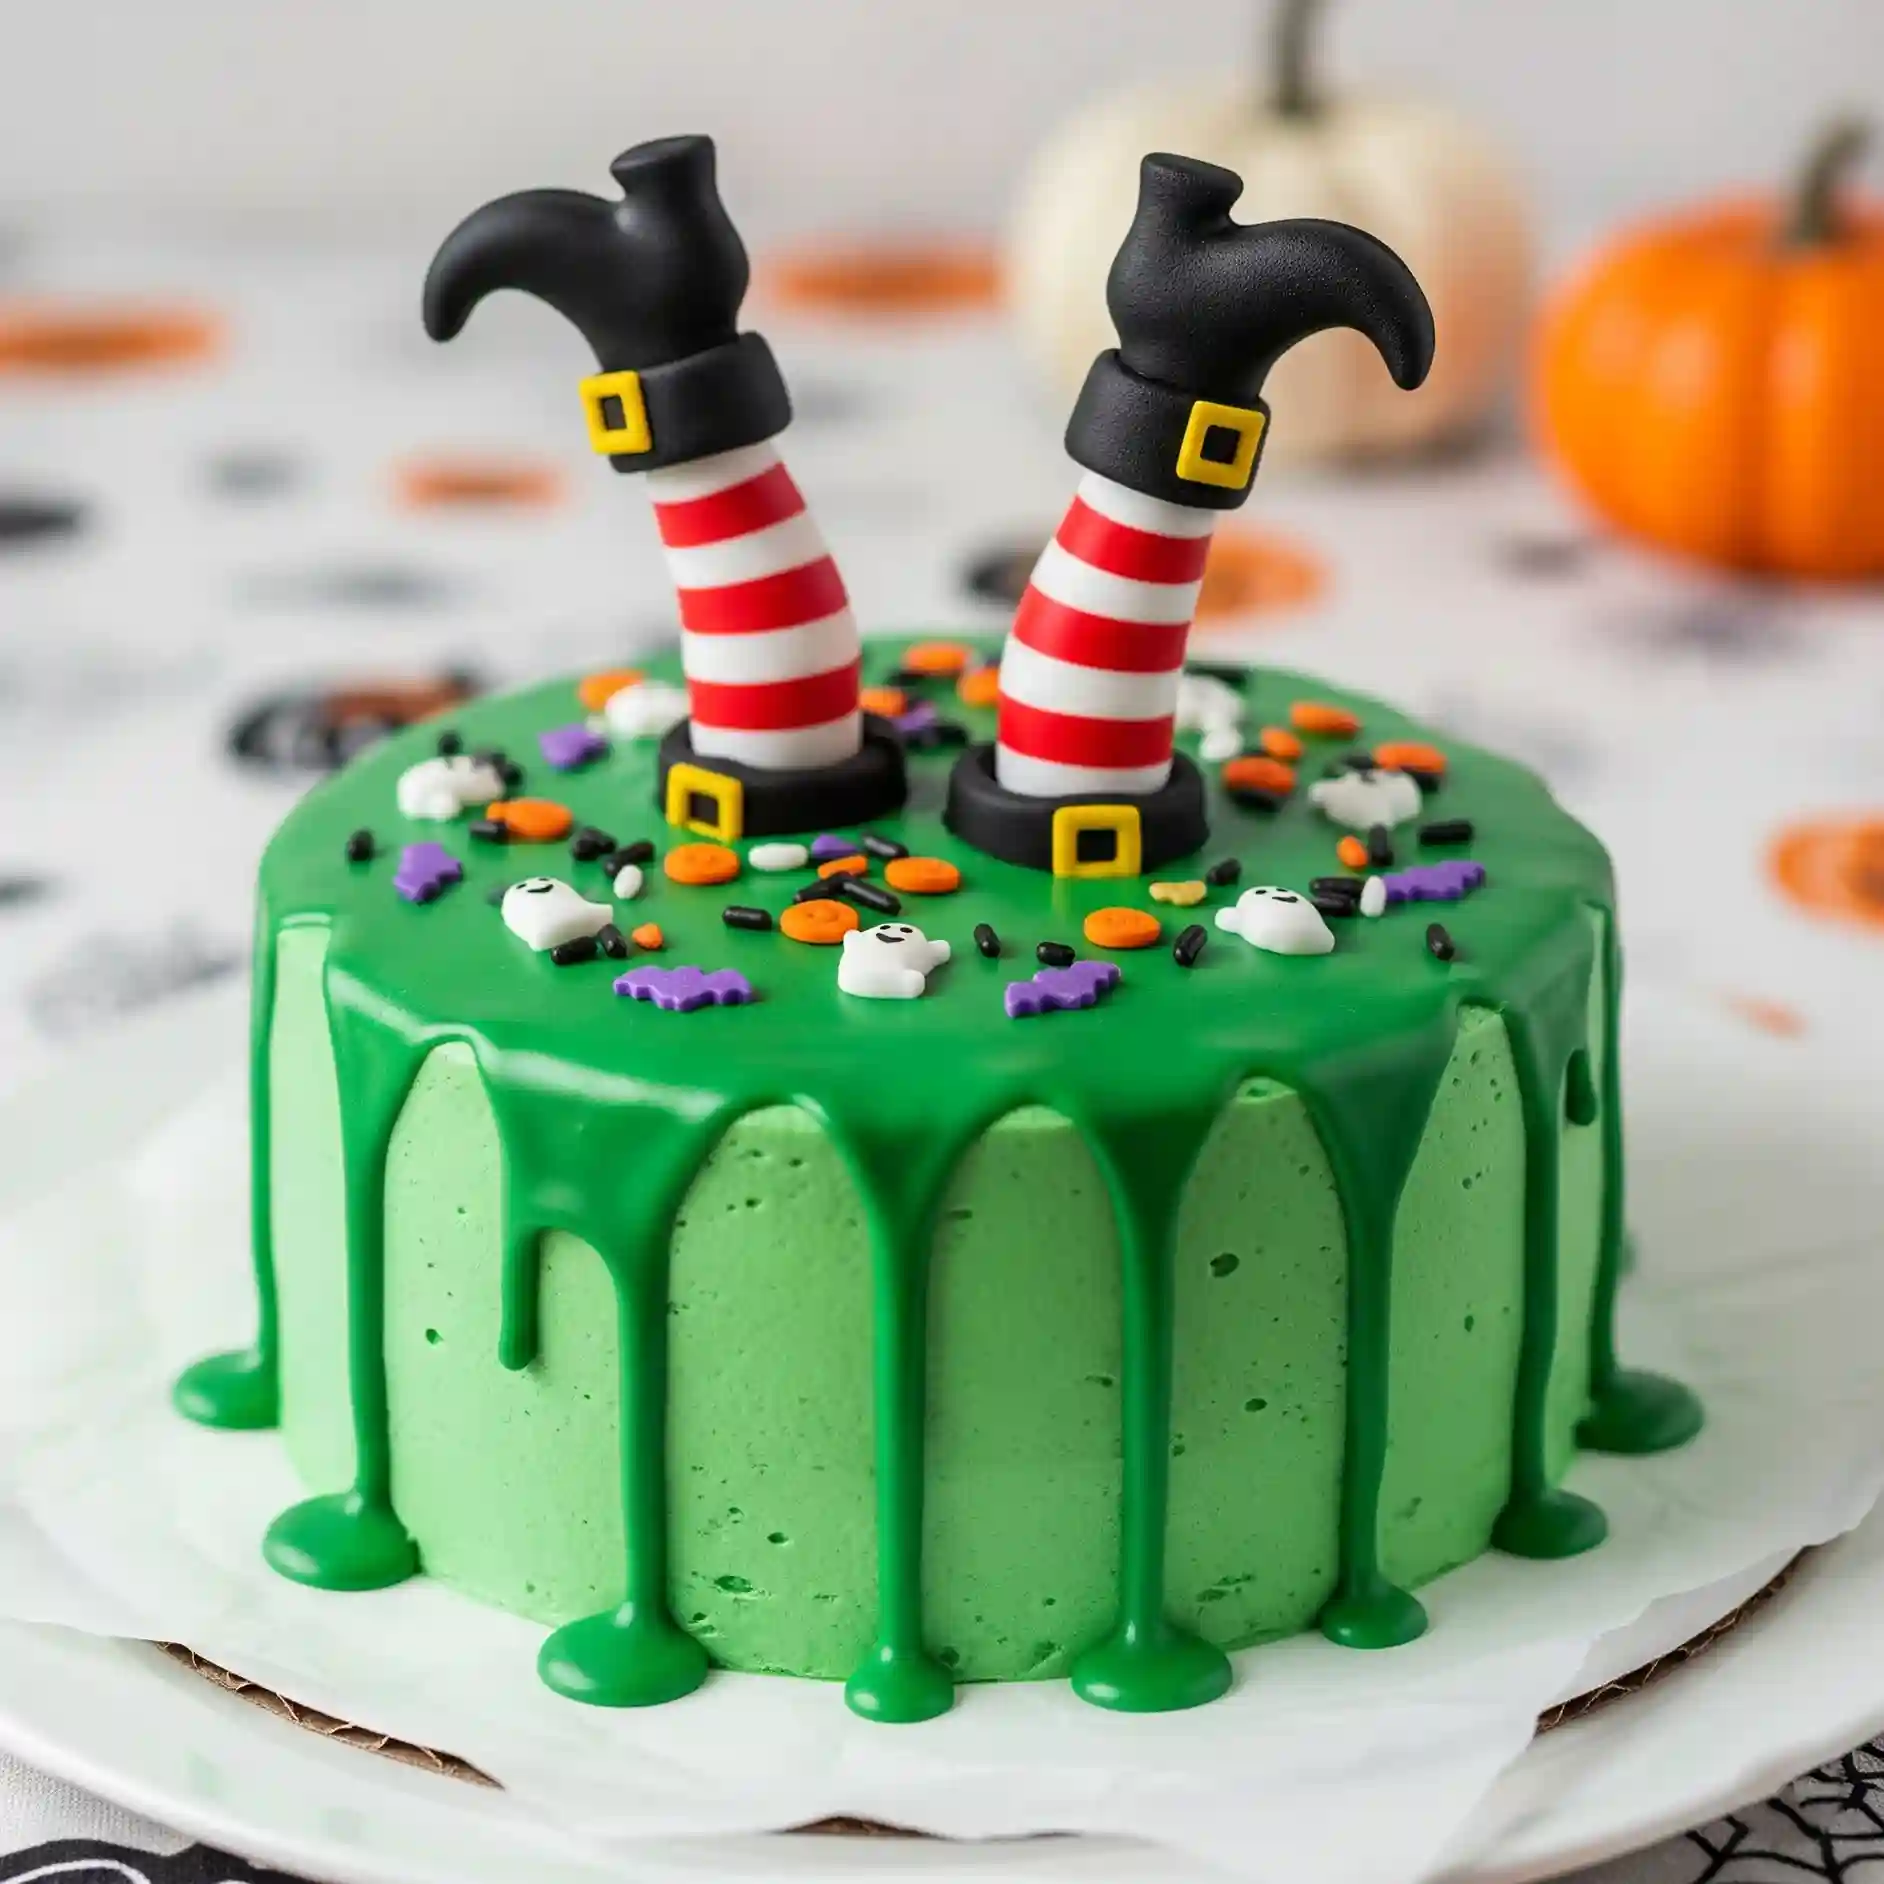
The melted witch cake looks like it tumbled right out of a storybook—striped witch legs sticking straight up, green frosting dripping down the sides, and colorful sprinkles scattered across the top.
It’s the kind of dessert that makes people laugh the moment they see it, before they even take a bite.
I made this cake with the idea of bringing a little humor to the Halloween table.
There are plenty of desserts that try to look spooky, but I wanted one that also made kids and adults grin instantly.
The bright green frosting, playful drip, and upside-down witch legs do just that. It looks like a kitchen project that was crafted with care, not rushed, and the end result is both whimsical and delicious.
This cake isn’t just about sugar and flour—it’s about the fun of building a centerpiece that tells its own story.
The green drip looks like a bubbling potion gone wrong, and the candy ghosts, bats, and pumpkins scattered on top give it personality.
It’s the type of dessert that doesn’t just sit on the table; it starts conversations.
Halloween Melted Witch Cake Recipe
Ingredients
For The Cake
- 2 ½ cups all-purpose flour
- 2 ½ teaspoons baking powder
- ½ teaspoon baking soda
- ½ teaspoon salt
- 1 cup unsalted butter, softened
- 1 ¾ cups granulated sugar
- 4 large eggs, room temperature
- 1 tablespoon vanilla extract
- 1 cup whole milk, room temperature
For The Green Frosting
- 1 ½ cups unsalted butter, softened
- 4 cups powdered sugar, sifted
- 3 tablespoons heavy cream
- 2 teaspoons vanilla extract
- Green gel food coloring
For The Green Ganache Drip
- 1 cup white chocolate chips
- ⅓ cup heavy cream
- Green gel food coloring
For Decoration
- Witch legs and boots made from fondant or edible decorations
- Halloween sprinkles (pumpkins, bats, ghosts, black and orange sprinkles)
Instructions
- Preheat oven to 350°F (175°C). Grease and line two 8-inch round cake pans with parchment paper.
- In a medium bowl, whisk together flour, baking powder, baking soda, and salt. Set aside.
- In a large mixing bowl, cream butter and sugar until light and fluffy, about 3 minutes.
- Add eggs one at a time, mixing well after each. Stir in vanilla extract.
- Alternate adding dry ingredients and milk to the butter mixture, beginning and ending with the dry ingredients. Mix until smooth but do not overbeat.
- Divide batter evenly into the prepared pans. Bake for 25–30 minutes or until a toothpick inserted in the center comes out clean.
- Allow cakes to cool in pans for 10 minutes, then transfer to a wire rack to cool completely.
- For the frosting, beat butter until creamy. Gradually add powdered sugar, mixing well. Add vanilla and heavy cream, then tint with green gel food coloring until a bright witchy shade is reached.
- Level cakes if needed, then spread a layer of frosting between the two cakes. Frost the entire cake with a smooth coat of green frosting. Chill for 20 minutes to set.
- To make ganache drip, heat heavy cream just until steaming, then pour over white chocolate chips. Let sit 2 minutes, then stir until smooth. Tint with green gel coloring. Allow it to cool slightly so it thickens but is still pourable.
- Gently spoon ganache around the edge of the cake so it drips down the sides. Spread a little on top as well for a melted effect.
- Place fondant witch legs in the center of the cake so they appear to be sticking out.
- Scatter Halloween sprinkles, little ghosts, bats, and pumpkins around the top for a playful finish.

What Makes A Halloween Melted Witch Cake Special?
The Halloween Melted Witch Cake is more than just dessert. It brings fun, laughter, and a playful story to the table.
Unlike regular cakes, this one feels alive with its witch legs, green drip, and colorful Halloween toppings.
It stands out at any gathering, not only for the taste but also for its decoration that sparks conversations.
Can I Use Different Cake Flavors For Halloween Melted Witch Cake?
Yes, you can choose the flavor that suits your taste. The decorations stay the same, but the base cake can be customized. Some popular options are:
- Chocolate Cake: Deep and rich flavor that balances well with the sweetness of the frosting.
- Vanilla Cake: Classic choice that lets the green frosting and toppings shine.
- Pumpkin Cake: Adds a seasonal twist with warm spices and autumn flavor.
- Red Velvet Cake: Bold color inside gives a surprising effect when sliced.
How Do I Make The Witch Legs For The Cake?
The witch legs are what give this cake its charm. You can make them at home or buy them ready-made. Here’s how to create them yourself:
- Fondant Or Gum Paste: Roll and shape into striped legs and boots, then let them dry before placing them on the cake.
- Edible Markers: Draw details like buckles or stripes for more realistic finishing touches.
- Support With Toothpicks Or Sticks: This keeps the legs standing firmly in the frosting without toppling over.
How Do I Get Smooth Green Frosting?
Smooth frosting makes the cake look professional. The trick lies in how you prepare and apply it:
- Crumb Coat First: Spread a thin layer of frosting all around the cake to trap crumbs, then chill before the final layer.
- Use A Bench Scraper: Hold it steady while turning the cake on a turntable for even sides.
- Gel Food Coloring: Always use gel coloring instead of liquid to avoid thinning out the frosting.
What’s The Secret To A Perfect Ganache Drip?
A good drip should look neat and flow naturally down the sides. Timing and texture are important here:
- Cool Ganache Slightly: If it’s too hot, it will run too fast and pool at the bottom.
- Check Consistency: It should be thick enough to cling to the cake but not stiff.
- Use A Spoon Or Piping Bag: Start with small drips and build up if needed for an even effect.
Can I Prepare Halloween Melted Witch Cake In Advance?
Yes, preparing ahead can save time, but you need to store it properly to keep it fresh.
- Bake The Cake A Day Early: Wrap cooled cake layers in plastic wrap and keep at room temperature.
- Make Frosting A Day Ahead: Store in an airtight container in the fridge, then re-whip before use.
- Assemble On The Same Day: Add decorations and ganache drip just before serving to keep them looking fresh.
How Do I Store Halloween Melted Witch Cake?
Storage is important because this cake has frosting and decorations that can soften over time.
- Room Temperature Storage: If you’re serving within 24 hours, keep the cake covered at room temperature in a cool area.
- Refrigerator Storage: For longer storage, refrigerate the cake in a cake box or airtight container. Bring it back to room temperature before serving for the best taste.
- Freezer Storage: Cake layers without frosting can be wrapped tightly and frozen for up to 2 months. Thaw overnight in the fridge before decorating.
Can I Use Different Decorations For Halloween Melted Witch Cake?
Yes, creativity makes this cake even more exciting. You can play with different decorations to suit your theme:
- Candy Eyes Or Ghosts: Adds a playful and silly effect.
- Chocolate Bats Or Spiders: Gives the cake more Halloween character.
- Colored Sprinkles: Mix orange, purple, and black sprinkles to keep the theme festive.
Expert Tips For Halloween Melted Witch Cake
Making a Halloween Melted Witch Cake is already fun, but small expert touches can take it from good to unforgettable. These little details make a big difference in the final look and taste.
- Keep Ganache Shiny: Always add the ganache drip after the frosted cake has chilled for at least 20 minutes. A cold cake helps the ganache set quickly, keeping it glossy and smooth instead of soaking into the frosting.
- Level Cake Layers: Before stacking, trim the tops of your cake layers with a serrated knife. This keeps the cake stable and prevents frosting from sliding off.
- Prevent Frosting Air Bubbles: Mix frosting on low speed at the end to push out extra air. This makes it creamier and easier to spread evenly.
- Use A Turntable: Decorating on a turntable gives you cleaner, straighter sides and makes drip placement more controlled.
- Support Fondant Legs: Insert a toothpick or wooden skewer into each fondant leg before placing it in the cake. This prevents them from tipping or sinking into the frosting.
- Add Sprinkles Just Before Serving: If sprinkles sit too long on ganache or frosting, they may bleed color. Adding them close to serving time keeps them bright and neat.
- Bring Cake To Room Temperature Before Serving: Frosting and cake taste better when slightly softened, so remove from the fridge 30–40 minutes before slicing.
Serving Suggestions For Halloween Melted Witch Cake
This Halloween Melted Witch Cake is more than dessert—it can be the star of your table. How you serve and present it makes the celebration even more exciting. Here are some fun ideas:
- Make It The Centerpiece: Place the cake on a black or orange cake stand right in the middle of the dessert table. Add small pumpkins, fake cobwebs, or plastic spiders around it for a playful setup.
- Pair With Themed Drinks: Serve the cake alongside green punch in a cauldron-style bowl, or offer hot chocolate topped with whipped cream and candy eyes. The cake pairs beautifully with both warm and chilled drinks.
- Cut For A Surprise: Use a sharp knife to slice neatly and show off the green frosting inside. If you chose a bold cake flavor like red velvet or pumpkin, the colors will make the slices even more striking.
- Add A Candle Glow: Place a few battery-operated candles around the cake for a magical touch. The soft lighting makes the witch legs and sprinkles stand out more in the evening.
- Serve With Mini Halloween Treats: Surround the cake with small candies, cake pops, or decorated cookies so guests can enjoy a variety of sweets. It turns the table into a fun Halloween dessert spread.
You May Also Like To Check Out These Recipes
- Crustless Pumpkin Pie
- Pumpkin Cream Cheese Muffins
- Baked Cinnamon Apples
- Oven Roasted Sweet Potatoes Wedges
- Roasted Sweet Potato Black Bean Bowl
- Pumpkin Pie Cookies
- Pumpkin Chocolate Chip Cookies
- Halloween Pumpkin Cake
- Creamy Pumpkin Soup With Roasted Seeds
- Soft & Fluffy Pumpkin Chocolate Chip Muffins
- Sweet Potato Casserole With Marshmallows
- Homemade Pumpkin Pie
- Decorated Pumpkin Shaped Cookies
- Mini Pumpkin Cheesecakes
- Pumpkin Cake With Cinnamon Cream Cheese Frosting
- Starbucks Pumpkin Cream Cheese Muffins
- Easy Tres Leches Cake With Box Mix
- Old-Fashioned Date Cake
- Funnel Cake
- Green Cake
- Vegan Apple Cake
- Delicious Sunset Cake
- Moist Plum Cake
- Under The Sea Cake With Ocean Decorations
- Jack Nightmare Before Christmas Cake
- Halloween Charcuterie Board
- Halloween Fruit Platter
- Halloween Veggie Tray
- Halloween Chocolate Bark
- Halloween Cookie Cake
- Halloween Graveyard Dirt Cake
- Halloween Eyeball Pizza
- No Bake Cheesecake Without Cream Cheese
- Halloween Cake Pops
- Halloween Chocolate Covered Strawberries
- Halloween Ghost Pizza