Halloween has always been more than costumes and candy for me—it’s about little details that make the day feel alive.
One year, I decided to surprise the kids with a fruit platter that looked straight out of a haunted kitchen.
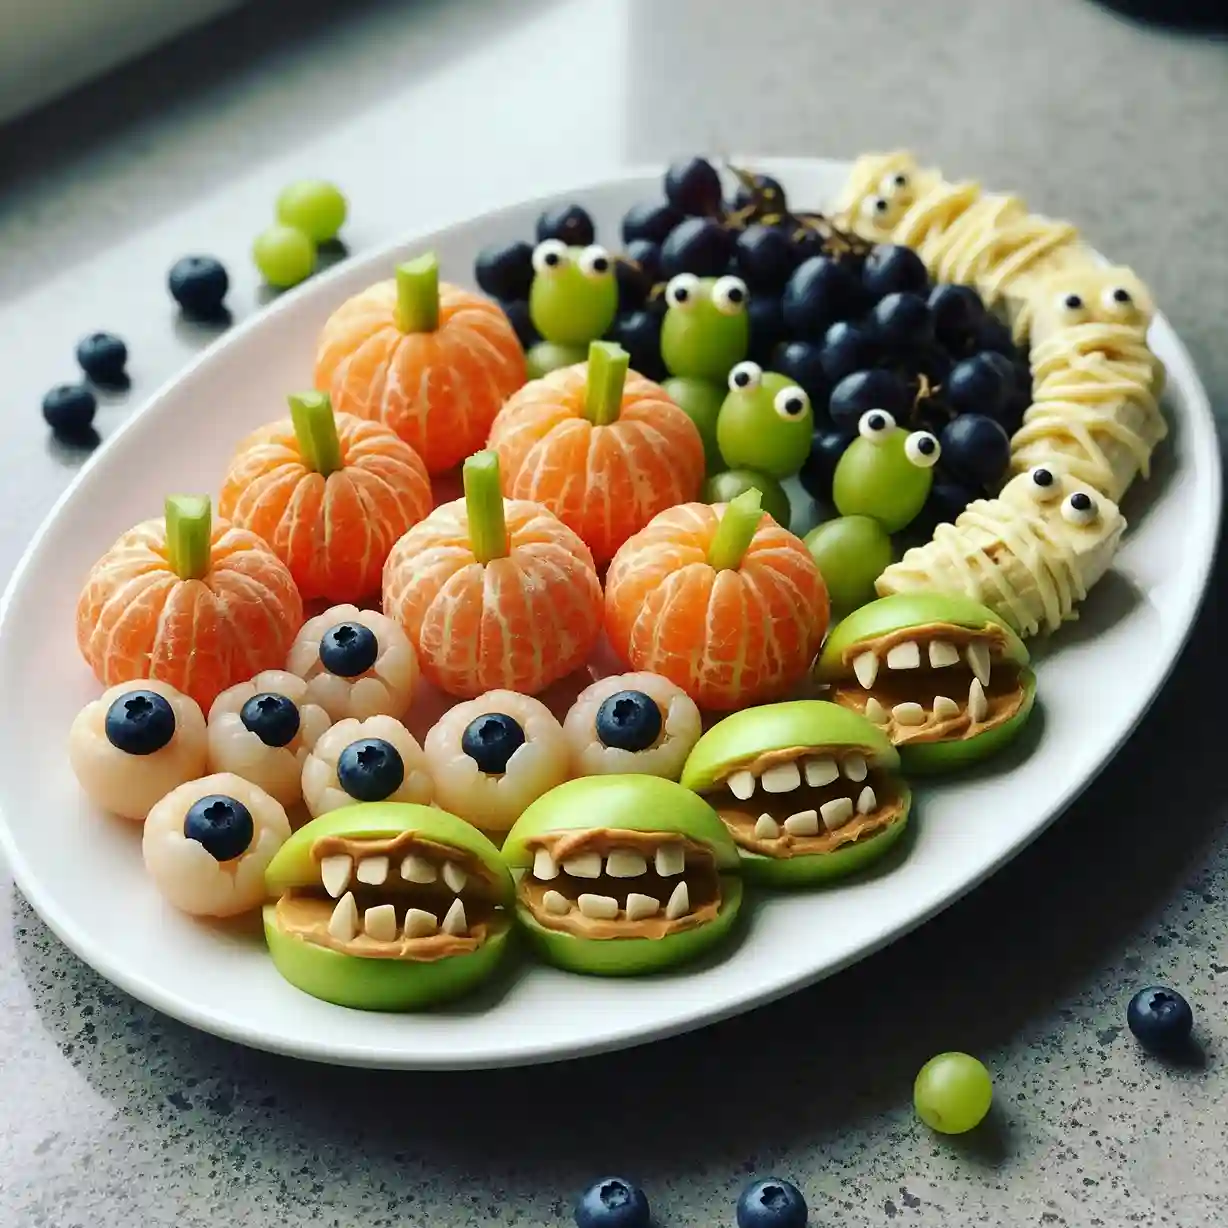
Instead of the usual sweets, I peeled bright clementines into tiny pumpkins, turned lychees into eerie eyeballs, and gave green apples wide peanut-butter mouths filled with crooked teeth.
Grapes suddenly had silly eyes staring back, and even cheese sticks wrapped themselves up like mummies. The laughter around the table said it all.
No one missed the candy bowl that night because the platter had its own kind of magic—it was playful, a little creepy, but still wholesome.
Ever since, I’ve kept this platter on the menu for every Halloween gathering.
It’s fun to build, it surprises guests every time, and most importantly, it makes both kids and adults reach for fruit without even realizing it.
Halloween Fruit Platter Recipe
Ingredients
- 5–6 seedless clementines (for pumpkins)
- 1–2 celery stalks (for pumpkin stems)
- 6–8 lychees, peeled and pitted (for eyeballs)
- 6–8 blueberries (for eyeball pupils)
- 2 green apples, cut into quarters (for monster mouths)
- 3–4 tablespoons peanut butter (or any nut/seed butter)
- Small white almonds or sunflower seeds (for monster teeth)
- 1 bunch green grapes (for spooky creatures)
- 1 bunch black grapes (for filler and contrast)
- Candy eyes or homemade edible eyes (made with white chocolate chips and mini chocolate chips)
- 2–3 string cheese sticks or mozzarella sticks (for mummies)
Instructions
- Start with the clementine pumpkins. Peel the clementines carefully to keep them intact. Cut small pieces of celery sticks and insert one into the center of each clementine to resemble a pumpkin stem.
- For the eyeballs, insert a blueberry into the hollow center of each lychee. Make sure the blueberry faces upward to look like a pupil. Arrange them together for a spooky effect.
- Prepare the monster mouths by cutting green apples into quarters, then slicing out a wedge from the middle of each piece to create a mouth shape. Spread peanut butter inside the gap. Insert almonds or sunflower seeds into the peanut butter to resemble sharp or funny teeth.
- For the grape creatures, use green grapes as the base and attach candy eyes on top with a tiny dab of peanut butter or melted chocolate. Pair them with clusters of black grapes for contrast.
- To create the mummy snacks, peel string cheese sticks and wrap thin strips around them to mimic mummy bandages. Place two candy eyes on each piece to complete the look.
- Arrange everything neatly on a large platter. Place the clementine pumpkins in one section, eyeballs in another, monster apples along the edge, grape creatures scattered around, and mummies grouped together. Fill empty spaces with extra grapes or blueberries for balance.

What Fruits Can Be Used To Make A Halloween Fruit Platter?
A Halloween fruit platter doesn’t always have to look the same, and you can play around with different fruits depending on what you like and what’s available.
- Clementines: These are peeled and turned into little pumpkins by adding celery stems.
- Lychees: Their hollow centers make them perfect for spooky eyeballs when paired with blueberries.
- Green apples: Cut into quarters and shaped into monster mouths with peanut butter and almond or seed teeth.
- Grapes: Both green and black grapes can be used, with candy eyes turning them into funny creatures.
- Cheese sticks: Although not fruit, these add a fun mummy effect and balance out the platter.
You can also experiment with strawberries, bananas, or kiwi slices if you want to add more variety. The key is to choose fruits that can be shaped or paired easily to create Halloween-style characters.
How To Prevent The Apples From Turning Brown?
Apples are a fun part of the platter, but they can brown quickly once sliced. The good news is, there are easy tricks to keep them looking fresh and green.
- Lemon juice: Brush or dip the cut apple pieces lightly in lemon juice. The acidity slows down browning.
- Salt water soak: A quick dip in very mild salt water (and then a rinse) can also delay browning without affecting taste.
- Honey water: A short soak in a mixture of honey and water can keep apples fresh while adding a natural sweetness.
This extra step makes a big difference, especially if you’re preparing the platter a few hours before serving.
Can The Halloween Fruit Platter Be Made Ahead Of Time?
Yes, you can prepare most of the platter in advance, but some details should be finished just before serving.
- Make-ahead items: Peel clementines, prepare lychees and blueberries for eyeballs, wash grapes, and peel string cheese for mummies. These can be stored in the refrigerator.
- Last-minute items: Assemble the apple monsters closer to serving time since they brown faster, even if treated with lemon juice. Attach candy eyes shortly before the party so they stay in place.
By splitting the work this way, you save time without losing the fresh and playful look of the platter.
How To Store Leftover Halloween Fruit Platter?
Since this platter is made mostly of fresh fruit, it is best enjoyed the same day. However, with proper storage, leftovers can still be kept safe and tasty.
- Refrigerate immediately: Store all fruits in airtight containers in the refrigerator.
- Clementines, lychees, grapes: These hold up well for 1–2 days when refrigerated.
- Apple monsters: These are best eaten the same day, even if treated to prevent browning.
- Cheese mummies: Wrap them well in plastic wrap and refrigerate, but serve within 1 day for the best taste and texture.
Keeping everything chilled is important to maintain freshness, especially since fruit can spoil quickly at room temperature.
How To Arrange A Halloween Fruit Platter So It Looks Impressive?
Presentation makes the biggest impact with this recipe, so arranging the fruits in a creative way matters.
- Group similar items together: Place clementine pumpkins in one section, lychee eyeballs in another, and apple monsters along the edge.
- Use color balance: Alternate between orange, green, black, and white fruits to make the platter eye-catching.
- Fill gaps: Use grapes and blueberries to cover empty spots so the platter looks full.
- Add height: Stack some fruits like grapes to create layers and keep the platter from looking flat.
When arranged neatly, the platter immediately grabs attention and feels festive, making it perfect for parties.
What Other Ideas Can Be Added To A Halloween Fruit Platter?
If you want to take your platter up a notch, there are plenty of fun add-ons that still keep the healthy theme intact.
- Banana ghosts: Slice bananas in half and use mini chocolate chips as eyes and mouths.
- Strawberry monsters: Slice strawberries and add tiny edible eyes with peanut butter or chocolate.
- Kiwi brains: Peel kiwis halfway and carve thin lines to make them look like tiny green brains.
- Melon cutouts: Use Halloween-themed cookie cutters to shape melon slices into bats, cats, or ghosts.
These little details not only expand variety but also keep guests excited to try every piece.
Tips For Serving Halloween Fruit Platter At Parties
Serving a Halloween fruit platter at a party isn’t just about how it looks—it’s also about keeping it fresh, fun, and easy for guests to enjoy. A little planning goes a long way in making sure it stays appealing throughout the event.
- Keep it chilled: If the party lasts a few hours, place the platter on a tray filled with ice or keep it refrigerated until serving. Cold fruit not only tastes better but also stays fresher.
- Use toothpicks or small skewers: This makes it easier for guests to grab pieces like lychee eyeballs, grapes, and apple monsters without using their hands.
- Offer small plates and napkins: Fruit can be juicy, and guests will appreciate having something to hold while eating.
- Pair with a dip: Serve a side of yogurt dip, peanut butter, or chocolate sauce in a small bowl for extra flavor. Kids especially love dipping the fruit.
- Refill in batches: Instead of putting everything out at once, keep some fruit in the fridge and replenish the platter as needed so it always looks fresh.
- Decorate the table: Place the platter on a black or orange tablecloth, scatter a few fake spiders or tiny pumpkins around it, and it instantly looks more festive.
These small details make the platter not just a snack but also a centerpiece that keeps everyone gathered around the table.
You May Also Like To Check Out These Recipes
- Crustless Pumpkin Pie
- Pumpkin Cream Cheese Muffins
- Baked Cinnamon Apples
- Oven Roasted Sweet Potatoes Wedges
- Roasted Sweet Potato Black Bean Bowl
- Pumpkin Pie Cookies
- Pumpkin Chocolate Chip Cookies
- Halloween Pumpkin Cake
- Creamy Pumpkin Soup With Roasted Seeds
- Soft & Fluffy Pumpkin Chocolate Chip Muffins
- Sweet Potato Casserole With Marshmallows
- Homemade Pumpkin Pie
- Decorated Pumpkin Shaped Cookies
- Mini Pumpkin Cheesecakes
- Pumpkin Cake With Cinnamon Cream Cheese Frosting
- Starbucks Pumpkin Cream Cheese Muffins
- Strawberry Icebox Cake
- Healthy Chocolate Zucchini Cake
- Moist Chocolate Cake
- Dubai Chocolate Pistachio Mousse Cake
- Neapolitan Cake
- Moist & Fluffy Blueberry Cake
- Strawberry Shortcake
- Angel Food Cake
- Cookies And Cream Cupcakes
- Funfetti Cupcakes
- Easy Tres Leches Cake With Box Mix
- Old-Fashioned Date Cake
- Vegan Apple Cake
- Delicious Sunset Cake
- Moist Plum Cake
- Under The Sea Cake With Ocean Decorations
- Jack Nightmare Before Christmas Cake
- Halloween Charcuterie Board