The first time I placed a tray of bat cookies on the table, the whole room froze for a second.
Everyone’s eyes locked on them before the laughter started, then the rush to grab one.
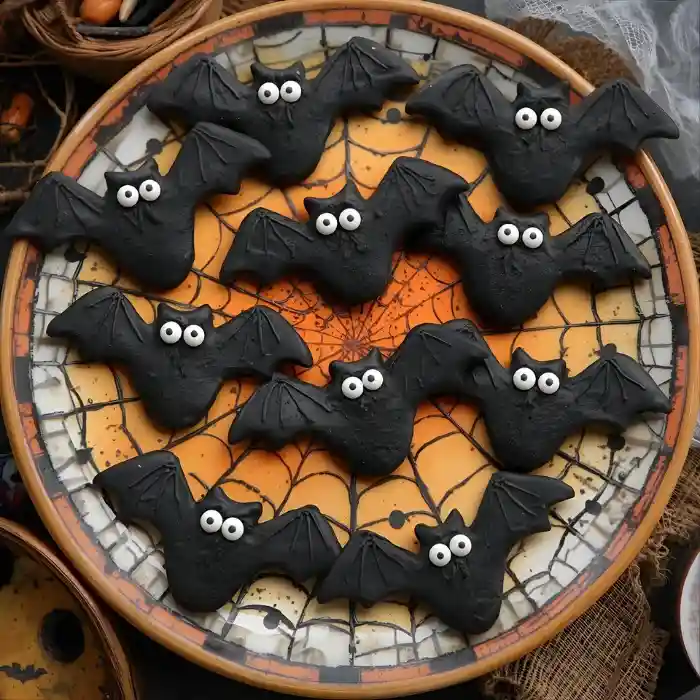
Their wide-eyed expressions staring back made the cookies feel alive, almost too playful to eat.
That’s exactly what makes them so much fun—they’re sweet, rich, and just a little mischievous.
What I love most is the way these cookies instantly set the mood for Halloween night.
They’re dark, bold, and perfectly shaped with wings that look ready to fly away.
The candy eyes give them personality, turning a simple chocolate cookie into a treat that feels like part of the celebration.
They’re not just dessert—they become part of the atmosphere, the kind of detail people remember long after the party ends.
Halloween Bat Cookies Recipe
Ingredients
- 1 cup unsalted butter, softened
- 1 cup granulated sugar
- 1 large egg
- 1 teaspoon vanilla extract
- 1 teaspoon baking powder
- 2 ½ cups all-purpose flour
- ½ cup unsweetened cocoa powder (dark cocoa works best for deep color)
- 1 teaspoon black gel food coloring (optional but helps achieve a rich black look)
- Candy eyeballs for decoration
Instructions
- In a large mixing bowl, beat butter and sugar together with an electric mixer until light and fluffy. This should take about 2–3 minutes.
- Add the egg and vanilla extract, then beat again until smooth. Scrape down the sides of the bowl to make sure everything mixes evenly.
- In another bowl, whisk together the flour, baking powder, and cocoa powder. Slowly add this dry mixture into the butter mixture. Mix on low speed until the dough starts to come together.
- If the dough looks too light brown, add black gel food coloring a little at a time until you reach a dark, bat-like shade. Mix well to incorporate the color evenly.
- Divide the dough into two portions, flatten each into a disk, and wrap in plastic wrap. Chill in the refrigerator for at least 1 hour. This helps the dough firm up and makes it easier to cut clean shapes.
- Preheat your oven to 350°F (175°C) and line two baking sheets with parchment paper.
- Lightly flour your work surface and roll out one portion of the chilled dough to about ¼ inch thickness. Keep the other portion in the fridge until ready to use.
- Use a bat-shaped cookie cutter to cut out bats from the dough. Place them gently on the prepared baking sheets about 1 inch apart.
- Bake the cookies for 8–10 minutes, or until the edges are set but the centers are still slightly soft. Do not overbake, as they will continue to firm up while cooling.
- Let the cookies cool on the baking sheet for 5 minutes, then transfer to a wire rack to cool completely.
- Once cooled, use a tiny dab of frosting or melted chocolate to stick the candy eyeballs onto each bat. Press gently so they stay in place.
- Allow the eyes to set before serving or storing.

Tips For Success
Making Halloween bat cookies is all about the small details. Here are some important tips that will make the process smoother and the cookies turn out great every time:
- Chill the dough: Cold dough is easier to cut and keeps the bat shapes sharp during baking.
- Flour lightly: When rolling out, use just enough flour on the surface and rolling pin to prevent sticking without drying out the dough.
- Even thickness matters: Roll the dough evenly, about ¼ inch thick, so the cookies bake at the same rate.
- Keep the wings intact: Transfer the cut-out bats carefully with a spatula to avoid bending the wings.
- Watch the oven closely: Bake just until the edges are set. Overbaking makes the cookies dry and can dull the color.
- Cool before decorating: Attach the candy eyes only after the cookies are completely cool to keep them from sliding.
- Use the right container: Store in a firm, airtight box rather than a soft bag to protect the wing shapes from breaking.
What Do Halloween Bat Cookies Taste Like?
Halloween bat cookies have a deep chocolate flavor with a hint of sweetness that balances perfectly.
The cookies are soft in the center with slightly firm edges, making them easy to bite into.
The candy eyeballs don’t just add fun—they bring a little crunch that contrasts nicely with the rich cookie base.
How Do You Shape The Cookies Into Bats?
Getting the right bat shape is what makes these cookies so eye-catching. A bat-shaped cookie cutter is the easiest way to achieve clean edges and uniform cookies.
After rolling out the dough, press the cutter firmly into the dough and lift carefully to keep the wings intact.
If the wings ever lose shape, you can gently adjust them with your fingers before baking. Keeping the dough chilled makes the shapes sharper and less likely to spread in the oven.
Can I Make Halloween Bat Cookies Without A Bat Cutter?
Yes, you can still create bat cookies even if you don’t own a cutter. Here’s how:
- Use a template: Print a bat outline, cut it out, place it over rolled dough, and trace around it with a sharp knife.
- Cookie carving: Draw bat shapes freehand on the dough with a butter knife for a rustic look.
- Wing adjustments: Press the dough with your fingers to sharpen edges before baking.
It takes a little more patience, but the result will still be fun and festive.
How Do You Get The Deep Black Color For Bat Cookies?
The dark bat look comes from cocoa powder and a touch of food coloring. Using dark cocoa powder gives the dough a naturally rich color. For an even deeper black finish, add black gel food coloring to the dough.
Gel coloring blends better than liquid and doesn’t change the texture of the dough. The key is mixing it in gradually until the color is bold and even.
How Do You Stick The Eyes On Halloween Bat Cookies?
The candy eyes need a bit of edible “glue” to hold in place. The best options are:
- Melted chocolate: Holds strongly and tastes great.
- Royal icing: Dries firm and keeps the eyes secure.
- Thick frosting: Works well if you’re serving the cookies right away.
Always wait until the cookies have completely cooled before attaching the eyes, or they might slide off.
Can Halloween Bat Cookies Be Made Ahead Of Time?
Yes, you can prepare the dough or the baked cookies in advance. The dough can be wrapped tightly and stored in the fridge for up to 3 days, or frozen for up to 2 months.
If freezing, let it thaw in the fridge before rolling out. Baked cookies can also be made a day or two early and decorated just before serving to keep them looking fresh.
How Do You Store Halloween Bat Cookies?
Storage is important to keep the cookies tasty and the decorations intact.
- Room temperature: Keep in an airtight container for up to 5 days.
- Stacking: Place parchment paper between layers to protect the eyes.
- Freezing baked cookies: Freeze undecorated cookies for up to 2 months. Add the candy eyes after thawing.
Always let the cookies cool fully before storing, or moisture may soften them too much.
Can You Add Extra Decorations To Halloween Bat Cookies?
Yes, you can get creative with the decorations. Some fun ideas include:
- Icing details: Outline the wings with royal icing for a sharper look.
- Sprinkles: Add a touch of sparkle with edible glitter or black sprinkles.
- Flavored eyes: Use small chocolate chips instead of candy eyes for a different twist.
This allows you to give each batch its own personality while keeping the bat theme intact.
What Occasions Are Halloween Bat Cookies Best For?
These cookies are perfect for Halloween night, but they also work well for themed school parties, bake sales, or movie nights with family.
Kids love their playful shape, while adults enjoy the rich chocolate flavor. They’re festive enough to decorate a party table and tasty enough to disappear quickly.
Common Mistakes To Avoid
Even simple steps can go wrong if you’re not careful. Here are the mistakes people often make and how to prevent them:
- Skipping the chill time: Warm dough spreads too much in the oven, and the bats lose their sharp shape. Always chill before cutting.
- Using too much flour: Adding excess flour while rolling makes the cookies tough instead of soft. Light dusting is enough.
- Rolling uneven dough: If some cookies are thin and others thick, they won’t bake evenly. Keep the dough at the same thickness all over.
- Forgetting parchment paper: Baking without parchment can make the cookies stick to the tray or break when lifted.
- Attaching eyes too soon: If the cookies are still warm, the candy eyes will melt or slide. Wait until they are fully cooled.
- Overbaking the cookies: Dark-colored dough can trick you into thinking it’s undercooked. Pull them out as soon as the edges look set.
- Stacking while warm: Warm cookies release steam that makes them soft and sticky. Always let them cool completely before stacking or storing.
You May Also Like To Check Out These Recipes
- Crustless Pumpkin Pie
- Pumpkin Cream Cheese Muffins
- Baked Cinnamon Apples
- Pumpkin Pie Cookies
- Pumpkin Chocolate Chip Cookies
- Halloween Pumpkin Cake
- Decorated Pumpkin Shaped Cookies
- Jack Nightmare Before Christmas Cake
- Halloween Charcuterie Board
- Halloween Fruit Platter
- Halloween Veggie Tray
- Halloween Chocolate Bark
- Halloween Cookie Cake
- Halloween Graveyard Dirt Cake
- Halloween Eyeball Pizza
- Halloween Cake Pops
- Halloween Chocolate Covered Strawberries
- Halloween Ghost Pizza
- Halloween Melted Witch Cake
- Halloween Mini Mummy Pizzas
- Halloween Vegan Spider Pizza Bites
- Pumpkin Cheese Ball
- 7 Layer Halloween Taco Dip
- Halloween Brownies
- Halloween Ghost Cookies
- Halloween Cheese Dip
- Halloween Deviled Eggs
- Halloween Dirt Cups
- Halloween Mummy Wrap Cookies
- Halloween Pasta Salad
- Halloween Frankenstein Cookies
- Halloween Oreos
- Halloween Popcorn Balls
- Halloween Pretzels
- Halloween Pumpkin Face Cookies
- Halloween Rice Krispie Treats
- Halloween Snack Mix
- Halloween Spiderweb Pancakes
- Halloween Spiderweb Cookies
- Halloween Vampire Teeth Cookies
- Halloween Witch Hat Cupcakes