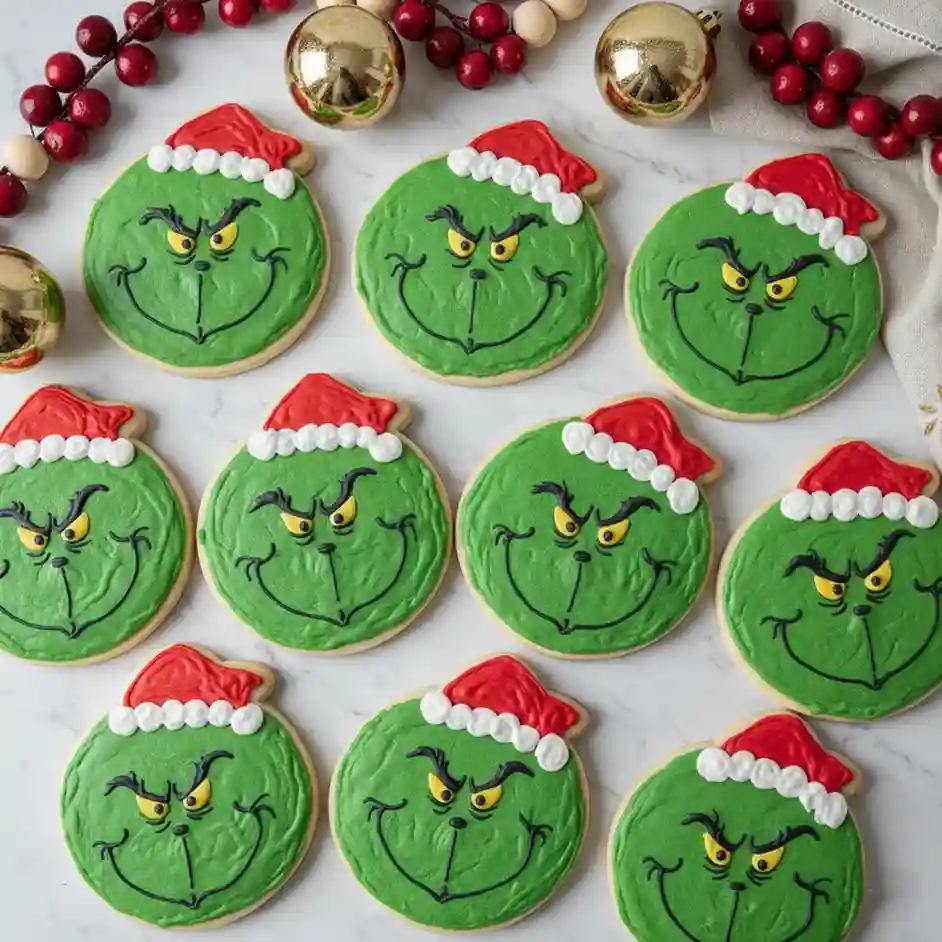
These Grinch cookies started as a decorating challenge I gave myself: round sugar cookies, clean edges, smooth green frosting, and a face that looks playful but sharp, not messy or cartoonish.
I wanted cookies that feel intentional, not rushed. The goal was a soft bite, a buttery base that holds its shape, and frosting that stays smooth instead of cracking or sliding.
Every detail in this recipe comes from testing texture, color depth, and piping control until the cookies looked uniform and expressive, tray after tray.
What keeps me coming back to these cookies is the balance between precision and fun. The dough rolls evenly without shrinking, the green frosting spreads like silk, and the facial details stay crisp once set.
These cookies ask for focus, but they reward you with a result that feels finished and confident. When you place them on a plate, they don’t need explanation.
They speak through clean lines, bold color, and that unmistakable mischievous expression.
Table of Contents
Grinch Cookies Recipe
Ingredients
Cookie Dough
- 2 ¾ cups all-purpose flour
- ½ teaspoon baking powder
- ¼ teaspoon fine salt
- 1 cup unsalted butter, softened to room temperature
- 1 cup granulated sugar
- 1 large egg, room temperature
- 2 teaspoons vanilla extract
Green Frosting
- 1 cup unsalted butter, softened
- 3 ½ to 4 cups powdered sugar, sifted
- 2 tablespoons heavy cream or milk (add slowly)
- 1 ½ teaspoons vanilla extract
- Green gel food color
Decoration Details
- Red gel food color
- Yellow gel food color
- Black gel food color
- White frosting or white candy melts for hat trim
Instructions
- In a medium bowl, whisk together flour, baking powder, and salt until evenly mixed. Set aside.
- In a large mixing bowl, beat the softened butter and granulated sugar until pale, fluffy, and creamy. This step is important for soft cookies, so beat for a full 2–3 minutes.
- Add the egg and vanilla extract to the butter mixture and beat again until fully combined and smooth.
- Gradually add the dry ingredients to the wet ingredients. Mix on low speed just until the dough comes together. Do not overmix or the cookies will become tough.
- Divide the dough into two portions, flatten slightly, wrap tightly, and refrigerate for at least 1 hour. Chilled dough helps the cookies keep their round shape.
- Preheat the oven to 350°F (175°C). Line baking sheets with parchment paper.
- Roll the chilled dough on a lightly floured surface to about ¼-inch thickness. Use a round cookie cutter to cut circles. Re-roll scraps as needed.
- Place cookies on the prepared baking sheets, leaving space between each one.
- Bake for 9–11 minutes, just until the edges are set but not browned. The tops should look pale and soft.
- Allow cookies to cool on the baking sheet for 5 minutes, then transfer to a wire rack and cool completely before decorating.
Making The Green Frosting
- In a large bowl, beat the softened butter until smooth and creamy.
- Add powdered sugar one cup at a time, beating well after each addition.
- Add vanilla extract and 1 tablespoon of cream or milk. Beat until smooth.
- Add green gel food color a little at a time until you achieve a bright Grinch-green shade.
- Add more cream or milk as needed to reach a thick but spreadable consistency. The frosting should hold its shape without dripping.
Decorating The Grinch Cookies
- Spread or pipe a smooth layer of green frosting over each cooled cookie, covering the surface evenly all the way to the edges.
- Using red frosting, pipe a Santa hat shape along the top edge of each cookie.
- Pipe small white dots or a fluffy trim at the base of the red hat and a small white pom-pom at the tip.
- Use yellow frosting to pipe almond-shaped eyes slightly angled for a mischievous expression.
- With black frosting, carefully pipe the eyebrows, eyes outlines, nose line, and the signature Grinch smile. Keep lines thin and slightly curved for the classic look.
- Allow the decorated cookies to set at room temperature for at least 30–40 minutes before stacking or storing.

Why Do Grinch Cookies Spread Or Lose Their Shape?
Keeping Grinch cookies perfectly round matters because the face design depends on clean edges and an even surface. Shape problems usually come from dough temperature or mixing habits.
Before the tips below, understand this: sugar cookie dough must stay cool and balanced to hold its form.
- Butter Temperature: Butter should be soft but not greasy. If it feels oily or shiny, the dough will spread more in the oven. Soft butter should press easily with a finger but still hold shape.
- Dough Chilling: Chilling the dough relaxes gluten and firms the butter. This prevents cookies from melting outward while baking and keeps edges neat.
- Overmixing: Mixing too long adds extra air and activates gluten. This causes uneven spreading and tougher cookies after baking.
- Oven Heat Accuracy: An oven that runs cooler allows butter to melt before the dough sets. Baking at the correct temperature helps cookies set fast and stay round.
How Do You Get The Perfect Green Color For Grinch Cookies?
The green shade is what makes these cookies instantly recognizable. A dull or pale color changes the entire look. Getting the color right depends on control, not quantity.
- Gel Food Coloring: Gel color gives strong pigment without thinning the frosting. Liquid color weakens frosting and creates streaks.
- Color Building: Start with a small amount and add gradually. The color deepens slightly as the frosting rests.
- Lighting Check: Look at the frosting under natural light. Artificial light can make green look brighter than it really is.
- Frosting Texture: Thick, smooth frosting holds color evenly. Thin frosting shows patchy tones and brush marks.
Why Does Frosting Crack Or Dry On Sugar Cookies?
Cracks in frosting can ruin the clean Grinch face design. This usually happens when moisture balance is off. Understanding frosting behavior helps you fix this quickly.
- Sugar Ratio: Too much powdered sugar pulls moisture out and causes cracking. Balance is key.
- Air Exposure: Leaving frosting uncovered dries the surface fast. Cover bowls tightly when not piping.
- Layer Thickness: Very thin layers dry too fast, while very thick layers can slump. Aim for an even medium layer.
- Room Conditions: Dry or hot rooms speed up drying. Let cookies set in a calm, moderate space.
How Do You Pipe Clean Grinch Facial Features?
Sharp facial details turn basic cookies into character cookies. Control matters more than speed. Focus on steady movement and proper consistency.
- Frosting Consistency: Black and yellow frosting should be slightly thicker than green frosting so lines stay crisp.
- Piping Pressure: Gentle pressure gives smoother lines. Squeezing too hard causes shaky edges.
- Order Of Piping: Pipe eyes first, then eyebrows, then the smile. This helps spacing stay balanced.
- Dry Time Between Steps: Allow a short rest between colors so lines do not bleed into each other.
Can You Make Grinch Cookies Ahead Of Time?
Yes, planning ahead works well for this recipe when done correctly. Use this approach to save time without losing quality.
- Baked Cookies: Plain baked cookies stay fresh at room temperature for up to 2 days when sealed properly.
- Decorated Cookies: Fully decorated cookies need time to set before stacking to avoid smudging.
- Freezing Option: Undecorated cookies freeze better than decorated ones and thaw without texture loss.
How Should You Store Grinch Cookies To Keep Them Fresh?
Storage affects softness, color, and decoration quality. Follow these steps for best results.
- Room Temperature Storage: Store cookies in a single layer or separated with parchment in an airtight container for up to 3 days.
- Refrigeration: Refrigerate cookies for up to 7 days if the environment is warm. Bring to room temperature before serving.
- Freezing: Freeze undecorated cookies for up to 2 months. Decorate only after thawing fully.
- Stacking Tip: Always let frosting set completely before stacking to avoid dents and smears.
Why Do Grinch Cookies Taste Dry After Baking?
Dry cookies are usually caused by baking errors, not the recipe itself. Small adjustments fix this issue easily.
- Bake Time: Even one extra minute can dry sugar cookies. Remove them when edges are set but centers are soft.
- Flour Measurement: Packing flour into the cup adds too much. Spoon flour gently and level it.
- Cooling Method: Leaving cookies on a hot pan too long continues baking. Move them after a short rest.

Decorated Grinch Cookies
Ingredients
Cookie Dough
- 2 ¾ cups All-Purpose Flour
- ½ teaspoon Baking Powder
- ¼ teaspoon Fine Salt
- 1 cup Unsalted Butter Softened To Room Temperature
- 1 cup Granulated Sugar
- 1 Large Egg Room Temperature
- 2 teaspoons Vanilla Extract
Green Frosting
- 1 cup Unsalted Butter Softened
- 3 ½ to 4 cups Powdered Sugar Sifted
- 2 tablespoons Heavy Cream Or Milk Add Slowly
- 1 ½ teaspoons Vanilla Extract
- Green Gel Food Color
Decoration Details
- Red gel food color
- Yellow gel food color
- Black gel food color
- White frosting or white candy melts for hat trim
Instructions
- In a medium bowl, whisk together flour, baking powder, and salt until evenly mixed. Set aside.
- In a large mixing bowl, beat the softened butter and granulated sugar until pale, fluffy, and creamy. This step is important for soft cookies, so beat for a full 2–3 minutes.
- Add the egg and vanilla extract to the butter mixture and beat again until fully combined and smooth.
- Gradually add the dry ingredients to the wet ingredients. Mix on low speed just until the dough comes together. Do not overmix or the cookies will become tough.
- Divide the dough into two portions, flatten slightly, wrap tightly, and refrigerate for at least 1 hour. Chilled dough helps the cookies keep their round shape.
- Preheat the oven to 350°F (175°C). Line baking sheets with parchment paper.
- Roll the chilled dough on a lightly floured surface to about ¼-inch thickness. Use a round cookie cutter to cut circles. Re-roll scraps as needed.
- Place cookies on the prepared baking sheets, leaving space between each one.
- Bake for 9–11 minutes, just until the edges are set but not browned. The tops should look pale and soft.
- Allow cookies to cool on the baking sheet for 5 minutes, then transfer to a wire rack and cool completely before decorating.
Making The Green Frosting
- In a large bowl, beat the softened butter until smooth and creamy.
- Add powdered sugar one cup at a time, beating well after each addition.
- Add vanilla extract and 1 tablespoon of cream or milk. Beat until smooth.
- Add green gel food color a little at a time until you achieve a bright Grinch-green shade.
- Add more cream or milk as needed to reach a thick but spreadable consistency. The frosting should hold its shape without dripping.
Decorating The Grinch Cookies
- Spread or pipe a smooth layer of green frosting over each cooled cookie, covering the surface evenly all the way to the edges.
- Using red frosting, pipe a Santa hat shape along the top edge of each cookie.
- Pipe small white dots or a fluffy trim at the base of the red hat and a small white pom-pom at the tip.
- Use yellow frosting to pipe almond-shaped eyes slightly angled for a mischievous expression.
- With black frosting, carefully pipe the eyebrows, eyes outlines, nose line, and the signature Grinch smile. Keep lines thin and slightly curved for the classic look.
- Allow the decorated cookies to set at room temperature for at least 30–40 minutes before stacking or storing.
You May Also Like To Check Out These Recipes
- 55 Christmas Cake Ideas That Make Your Holiday Table Shine
- 180+ Christmas Dinner Ideas For A Complete Holiday Meal
- Best Prime Rib Recipe
- White Chocolate Cranberry Cookies
- Cranberry Christmas Cake
- Chocolate Yule Log Cake
- Christmas Cake Pops
- Christmas Tree Cake Cheesecake
- Beef Wellington
- Chicken Pot Pie
- Cranberry Jalapeño Dip
- Cranberry Pecan Cheese Ball
- Eye of Round Roast
- Slow Roasted Beef Tenderloin
- Perfect Rib Eye Steak In Oven
- Standing Rib Roast
- Gluten Free Yorkshire Puddings
- Homemade Creamed Spinach
- Green Beans Almondine
- Vegan Spinach Artichoke Dip
- Eggnog Cheesecake
- Potato Candy
- Homemade Cranberry Sauce
- Brown Butter Chocolate Chip Cookies
- Melt-In-Your-Mouth Eggnog Cookies
- Perfectly Spiced Ginger Molasses Cookies
- Christmas Chex Mix
- Christmas Chocolate Chip Cookies
- Cranberry Bliss Bars
- Christmas Rice Krispie Treats
- Christmas Tree Pizza