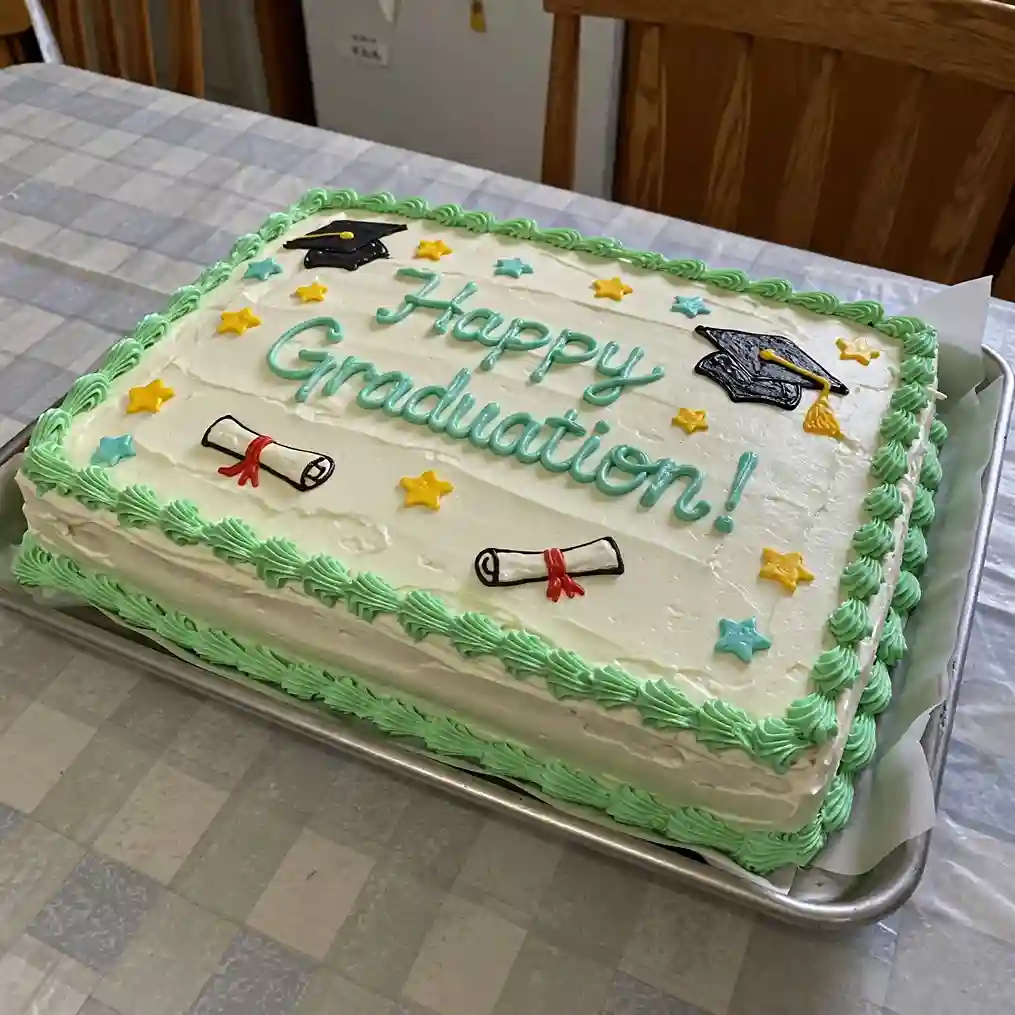
I baked this graduation sheet cake for my niece’s high school party last June. She didn’t ask for anything special—just “a vanilla cake, maybe with some green icing.”
But I knew this wasn’t just any cake. You don’t walk across that stage every day. And in our family, we celebrate properly—with food that shows effort.
So I cleared a weekend, rolled up my sleeves, and made the kind of sheet cake that actually turns heads. The kind you don’t have to explain. It just looks like it belongs at the center of a celebration.
This one has everything in the right place: thick, soft layers of vanilla cake that stay moist for days, silky frosting that pipes like a dream, and every little detail hand-done—right down to the caps, stars, and diploma ribbons.
It’s clean, cheerful, and proud without being over the top. Exactly what the day called for.
I’ve made cakes for weddings, birthdays, and holidays—but this one still stands out. Not because it’s the flashiest, but because it marked a moment.
And sometimes, that’s all you want a cake to do. Show up, taste incredible, and quietly say, “This was a big deal.”
Graduation Sheet Cake Recipe
Ingredients
For The Vanilla Sheet Cake
- 3 ½ cups all-purpose flour (sifted)
- 2 ½ tsp baking powder
- ½ tsp baking soda
- ½ tsp salt
- 1 cup unsalted butter (softened to room temp)
- 2 ¼ cups granulated sugar
- 5 large eggs (room temp)
- 1 tbsp vanilla extract
- 1 ½ cups whole milk (room temp)
- ½ cup sour cream (room temp)
For The Vanilla Buttercream Frosting
- 1 ½ cups unsalted butter (softened to room temp)
- 6 cups powdered sugar (sifted)
- 2 tsp pure vanilla extract
- 4–6 tbsp milk or cream (adjust consistency)
- Pinch of salt
- Green gel food coloring (for border)
- Aqua blue gel food coloring (for lettering)
- Yellow, red, and black gel food coloring (for decorations)
For The Decorations
- Piping gel or royal icing (optional, for extra detail)
- Small edible star sprinkles (yellow)
- Star and diploma icing decorations (made from royal icing or piped buttercream)
- Graduation cap decor (piped with black and yellow-tinted buttercream or pre-made edible toppers)
Instructions
- Preheat your oven to 350°F (175°C). Lightly grease a 12″x18″ sheet cake pan and line with parchment paper for easy removal.
- In a medium bowl, whisk together flour, baking powder, baking soda, and salt. Set aside.
- In a stand mixer fitted with the paddle attachment, cream butter and sugar together on medium-high speed for 3–5 minutes until light and fluffy.
- Add eggs one at a time, beating well after each addition. Scrape down the bowl as needed.
- Mix in the vanilla extract.
- In a small bowl, whisk together milk and sour cream until smooth.
- With the mixer on low, alternate adding dry ingredients and the milk mixture in three additions, beginning and ending with the dry ingredients. Mix until just combined—do not overmix.
- Pour the batter into the prepared sheet pan and smooth the top with an offset spatula.
- Bake for 30–35 minutes, or until a toothpick inserted in the center comes out clean. Let the cake cool completely in the pan before decorating.
Buttercream Frosting & Decoration
- In a stand mixer, beat the butter on medium-high speed for 3 minutes until creamy and pale.
- Gradually add sifted powdered sugar, one cup at a time, mixing on low speed to avoid a sugar cloud.
- Add vanilla extract, a pinch of salt, and 4 tablespoons of milk. Beat on high for 2–3 minutes until fluffy. Add more milk as needed to achieve a smooth, spreadable consistency.
- Remove 1 cup of buttercream and tint with green gel food coloring. Place into a piping bag fitted with an open star tip for borders.
- Tint a small amount of frosting with aqua blue for the “Happy Graduation!” lettering. Use a piping bag with a small round tip for clean lines.
- Tint smaller amounts of frosting with red (for diploma ribbons), black (for grad caps), and yellow (for tassels and stars).
Assembly & Design
- Spread a thick, even layer of white buttercream over the cooled cake using an offset spatula. Smooth the surface carefully.
- Pipe a neat green border around the edges using your star tip. Aim for soft, continuous swirls.
- Pipe the message “Happy Graduation!” across the top center in aqua blue using steady pressure and a consistent script style.
- Decorate the corners and edges with piped graduation caps, yellow stars, and diplomas using the colored frosting.
- Add yellow edible star sprinkles scattered around the surface to match the cake in the image.
- Optional: Use piping gel or royal icing for added shine and extra detailing on the diplomas and hats.
- Chill the cake for 20–30 minutes before serving to allow the decorations to set.

How Many People Does It Serve?
This graduation sheet cake is made in a full-size 12×18-inch pan, which gives you a generous number of servings for a celebration.
- Feeds around 30–40 people: If you cut the cake into small party-sized pieces, you can easily serve 40. For larger slices, plan for about 30 servings.
- Great for large groups: This size is perfect for school parties, family gatherings, or backyard celebrations where you expect a crowd.
- Easier slicing: The flat shape makes it easy to cut and serve quickly, especially with a serrated knife or cake cutter.
Just remember—how many people it serves depends on how big the slices are. You can always adjust the portion size to stretch it further or make it more generous.
Can I Make This Graduation Sheet Cake Ahead Of Time?
Yes, you absolutely can—and in fact, it often turns out better that way.
- Bake the cake layers 1–2 days early: Once baked and completely cooled, wrap the cake tightly in plastic wrap and store it at room temperature or in the fridge.
- Make the frosting a few days ahead too: Store it in an airtight container in the fridge, and let it come to room temp before re-whipping.
- Decorate a day before the party: This gives the frosting time to set and lets you relax on the actual event day.
- Freeze if needed: You can freeze the unfrosted cake for up to a month. Just wrap it well in plastic and foil, and thaw overnight in the fridge before decorating.
How Do I Get Smooth Frosting Like Bakery Cakes?
Getting that clean, smooth finish takes a bit of patience—but it’s very doable at home.
- Use a turntable and offset spatula: These tools make it much easier to spread the frosting evenly without dragging or tearing the cake.
- Apply a crumb coat first: This is a thin first layer of frosting that seals in crumbs. Chill it for 15–30 minutes before adding the final layer.
- Use room temperature frosting: Soft, spreadable frosting goes on smoother and won’t tug at the cake.
- Dip your spatula in hot water: Wipe it dry, then gently smooth the frosting. The heat melts the buttercream just enough for a polished finish.
- Don’t rush: Take your time smoothing the sides and top. Step back, rotate the cake, and fix small bumps as you go.
Can I Use Store-Bought Frosting Or Cake Mix Instead?
Yes, you can—but keep a few things in mind if you want the same look and taste.
- Cake mix works well for shortcuts: Use two standard cake mix boxes for a 12×18-inch sheet cake. Add an extra egg or a spoon of sour cream for better texture.
- Store-bought frosting can be used, but it’s softer: To make it firmer, beat in a bit of powdered sugar until it’s thick enough for piping.
- Flavor matters: Homemade frosting has a richer, less artificial taste. But for speed and convenience, store-bought is a workable option.
- Piping and decorating: If you plan to decorate in detail, make sure your frosting holds its shape. Some canned frostings are too soft for sharp piping.
Use what works best for your schedule, but know that the homemade version will always have a little more depth in flavor and structure.
Can I Color The Frosting With Natural Ingredients?
Yes, you can use natural options to tint your frosting, but the shades may be softer and not as bold as gel food coloring.
- Beet juice or powder for pink/red tones: Add a few drops at a time to avoid thinning the frosting too much.
- Turmeric for yellow: A tiny pinch goes a long way and gives a warm yellow shade.
- Matcha or spinach powder for green: These add soft green tones without overpowering the frosting.
- Purple cabbage water (with a little baking soda) for blue: This works, but it’s best used in small amounts to avoid flavor changes.
Natural coloring is safe and gentle, especially for kids, but just keep in mind the colors may fade slightly over time or in bright lighting.
What’s The Best Way To Store A Decorated Graduation Sheet Cake?
Storing your cake the right way keeps it fresh and looking great until party time.
- Keep it covered and cool: Use a cake box, large airtight container, or wrap loosely with plastic wrap to protect the frosting.
- Refrigerate if you’ve decorated in advance: The fridge helps set the frosting and keeps everything safe, especially in warm weather.
- Bring to room temperature before serving: Let the cake sit out for 30–45 minutes so the frosting softens slightly and tastes better.
- Avoid stacking things on top: Even a light touch can smudge your piping and designs.
If your party is the next day, refrigerating the fully decorated cake overnight is the best option. Just make sure it’s covered, and you’ll be ready to go.